Creating a Delivery
In Structure.Deliver, each project is called a “delivery”. Before you can create a delivery, you first need to define a structure that contains the data for your project (Deliver uses Structure for Jira to track data for each project).
Deliver follows the permissions of the source structure. In order to create a delivery from a structure, you must have edit permissions for that structure. If you do not have the appropriate permissions, you will need to request access from the structure owner or your Jira admin.
Step 1: Define a Structure
When setting up the delivery's data structure, you should include two levels of issues:
- The first level is the work estimation level, defined using Jira “epics”. This level describes the kinds of work, in broad strokes, each team will need to do in order to fulfill their commitments to the delivery. Structure.Deliver uses this level to predict how many stories each team will likely generate by the end of the delivery.
- The second level provides more detail about what will be required to complete each epic, typically using “stories” and “tasks”. Structure.Deliver uses this level to track the scope of the delivery.

Step 2: Create A Delivery
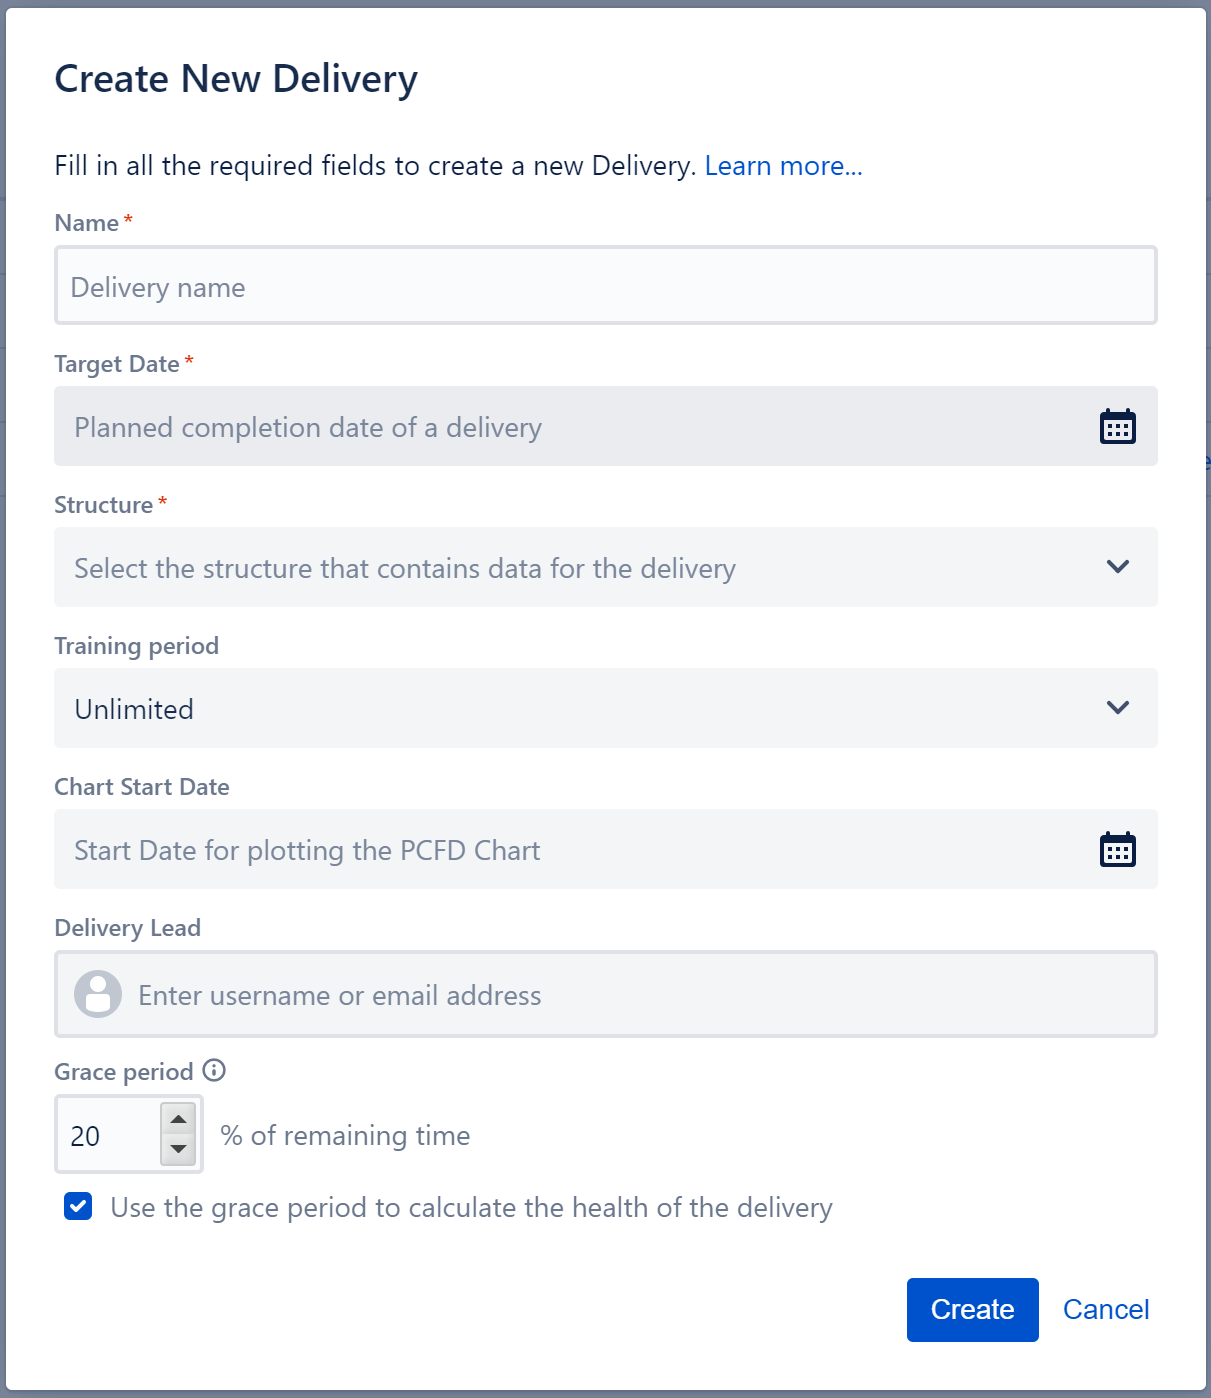
Select the “Create New Delivery” button at the top of the Dashboard. A dialog will appear requesting the details for the delivery you want to create.

Name
Provide a name for the delivery. This will appear in the Structure.Deliver UI. The name should be consistent with how the organization talks about the project. Typically, short, two-word names are best. For example, “Widget 2.0,” “NYC Launch,” “Summit 2021.” If the organization has already settled on a short name, then that should be used.
Target Date
The target date is the goal by which all scope in the delivery should be completed. When first creating a delivery, this can be set to the ideal date, with the understanding that the date may change after the teams have been interviewed and estimation level requirements defined.
Structure
Select the structure to use as the data source for the delivery. This structure should have been defined previously, according to the hierarchy described above.
Training Period
Select how many weeks of historical data to use to estimate the throughput of each team. For example, selecting “4 weeks” will limit the data Structure.Deliver uses to calculate each team's throughput to the most recent four weeks.
We typically recommend setting this to "Unlimited" at the start of the project, so Structure.Deliver can pull from as much historical data as is available. After the delivery is about 75% complete, we suggest setting it to 6 to 8 weeks, which will make Structure.Deliver more sensitive to current trends for each team. This setting can be adjusted at any time.
Team throughput estimations are based on historical data from the delivery's source structure only. If a team is working on more than one delivery, their throughput estimate may be different for each.
Chart Start Date
Select the starting date for the chart. This does not have to be the project start date. It is simply the date the first data will appear on the chart.
Delivery Lead
Enter the user name or email address of the main contact for this delivery. This is the person someone should go to if they have a question about the delivery.
Grace Period
Structure.Deliver issues a warning whenever a team's trending date is past the delivery's target date. By setting a grace period, you can avoid these warnings when a trending date falls within a specified range of the the target date.
Grace period is calculated as a percent of the remaining time on the delivery. For example, a grace period of 20% on a delivery with 10 weeks remaining (70 days) would produce a grace period of 14 days. As the time remaining for the delivery decreases, the grace period window narrows – when there are only 4 weeks (28 days) remaining, the 20% grace period will constrict to 5.6 days.