Project Manager
With Structure, you can easily create a visual overview of your projects – and visualize all the data you need to track on a single screen.
Step 1: Build Your Structure
To create a new structure:
- Open the Structure Selector menu and select Create New Structure
- Use the +Add menu to add issues and build your hierarchy:
- Use Presets to use one of Structure's preconfigured hierarchies
- Or configuring your own hierarchy using +Add | Insert | Basic Insert, +Add | Group, and +Add | Extend
Step 2: Add Data
- Jira fields, such as status, assignee, sprint, or remaining estimate
- Progress - track status based on issue progress, percent completion, or resolution
- Formulas - create your own formulas to compare fields or create a visual report
Tempo Work Logged - track how long your team is spending on each issue

Once you've added your columns, you can aggregate the data up the structure. To do so, open the column you want to aggregate and select Sum over sub-items.
Looking to visualize your structure data as a chart or other report? Our integration with Custom Charts for Jira makes it easy to build customizable charts from your structure data. Learn more
With Structure, you can easily organize issues into an advanced Agile hierarchy (Epics > Issues > Sub-tasks) AND identify any issues that aren't attached to epics.
Step 1: Create a New Structure
Open the Structure Selector menu and select Create New Structure.
Step 2: Add Two Folders
Open the +Add menu and select Folder. Add two folders, named:
- "Agile Hierarchy"
- "Issues without Epics"

Step 3: Insert Epics
Select the Agile Hierarchy folder, so that its row is highlighted, and add a JQL Query Insert Generator:
- Go to +Add | Insert | JQL Query
- Enter the following JQL query:
issuetype = Epic- To limit the epics to specific projects or other variables, add additional specifications (Example:
AND project = "My Epics")
- To limit the epics to specific projects or other variables, add additional specifications (Example:
- Change the Place the generators on selection to Level below - this will add the epics under the Agile Hierarchy folder
- Click Create
All your epics should now be placed beneath the Agile Hierarchy folder.

Step 4: Insert Issues and Sub-tasks
Make sure the "Insert issues: issuetype = Epic" row is selected, and return to the +Add menu. This time, select Extend | Child issues. Under Add, select Issues below epics and Sub-tasks.
Step 5: Insert Issues without Epics
Next, we need to make sure we don't lose track of any issues that aren't linked to epics yet. That's what our second folder is for:
- Select the "Issues without Epics" folder
- Go to: +Add | Insert | JQL Query
- Enter the following JQL query:
issuetype != Epic AND issuetype in standardIssueTypes() AND "Epic Link" is empty- If you narrowed your query to specific projects, etc. for your epics, do the same here
- Change the Place the generators on selection to Level below - this will add our issues under the folder
- Click Create
Any issues that are not assigned to epics should now appear beneath the second folder.

Step 6: Assign Issues to Epics / Reassign Issues
Now that you have all your issues organized and in one place, you can assign issues from the second folder to epics, or even reassign issues that already have epics.
Assigning Issues to Epics
To assign issues in the second folder to an epic:
- Drag the issues to the epic you want to assigned them to.
- While dragging, hold down the ctrl key - this copies the issue to the new location in the structure. Once the issue is copied to the new location, it should disappear from beneath the second folder (because now it's assigned to an epic).
Don't worry: copying an item in Structure does not make a copy in Jira.
Reassigning Issues to New Epics
To reassign issues from one epic to another, simply drag them from beneath their current epic to the new epic.
With Structure, you can track all the issues for upcoming releases – even if they're from different projects – and visualize all the data you need to track on a single screen.
Step 1: Build a Release Management Structure
To create a structure for release management:
- Open the Structure Selector menu and select Create New Structure
- Add the issues you want to track – you can add them manually or automatically using +Add | Insert | Basic Insert
- Group issues by fix version: +Add | Group | Field | select "Fix Version/s"

Want to include epics and stories?
When inserting issues, add epics: +Add | Insert | Basic Insert | open the Issue Types dropdown and select Epic
Add your stories: +Add | Insert | Child Issues | under Add, select Issues under epics and (optional) Sub-tasks.
Step 2: Add Data
- Jira fields, such as status, assignee, sprint, or remaining estimate
- Progress - track status based on issue progress, percent completion, or resolution
- Formulas - create your own formulas to compare fields or create a visual report
Tempo Work Logged - track how long your team is spending on each issue
Once you've added your columns, you can aggregate the data up the structure. To do so, open the column you want to aggregate and select Sum over sub-items.
Looking to manage resources for your next project? Planner makes it easy to plan resources and capacity for your team.
Tempo's Strategic Portfolio Management solution is a modular approach to help organizations focus their priorities, people, and spend across their portfolio of products and services.
Build your portfolio roadmap in Roadmunk.
Manage your work in Structure:
Link your roadmap plans to existing work or create new work.
Assign the work to teams.
Manage timelines, dependencies, and resource allocations in Structure.Gantt.
Track work in Structure or Jira. As teams work, their progress is automatically updated in Structure.
Update the original roadmap with up-to-date execution data, allowing leadership to make decisions based on real-time information.
Monitor the financial health of your portfolio using Cost Tracker and Structure.
Manage resources and resource allocation with Planner and Structure.Gantt.
Build custom reports to monitor your portfolio with Custom Charts for Jira.
Strategic Portfolio Management with Tempo Apps
When you're working across multiple projects and teams, chances are there are some inconsistencies between the link types being used.
The following guide will show you how to quickly update all your links to a single, consistent link type using Structure.
Step 1: Build a Simple Structure
- Create a new, blank structure and add 2 folders: "Original Link Type" and "New Link Type".
- Manually add your parent initiative to both folders. Note: this should be the same initiative for both.
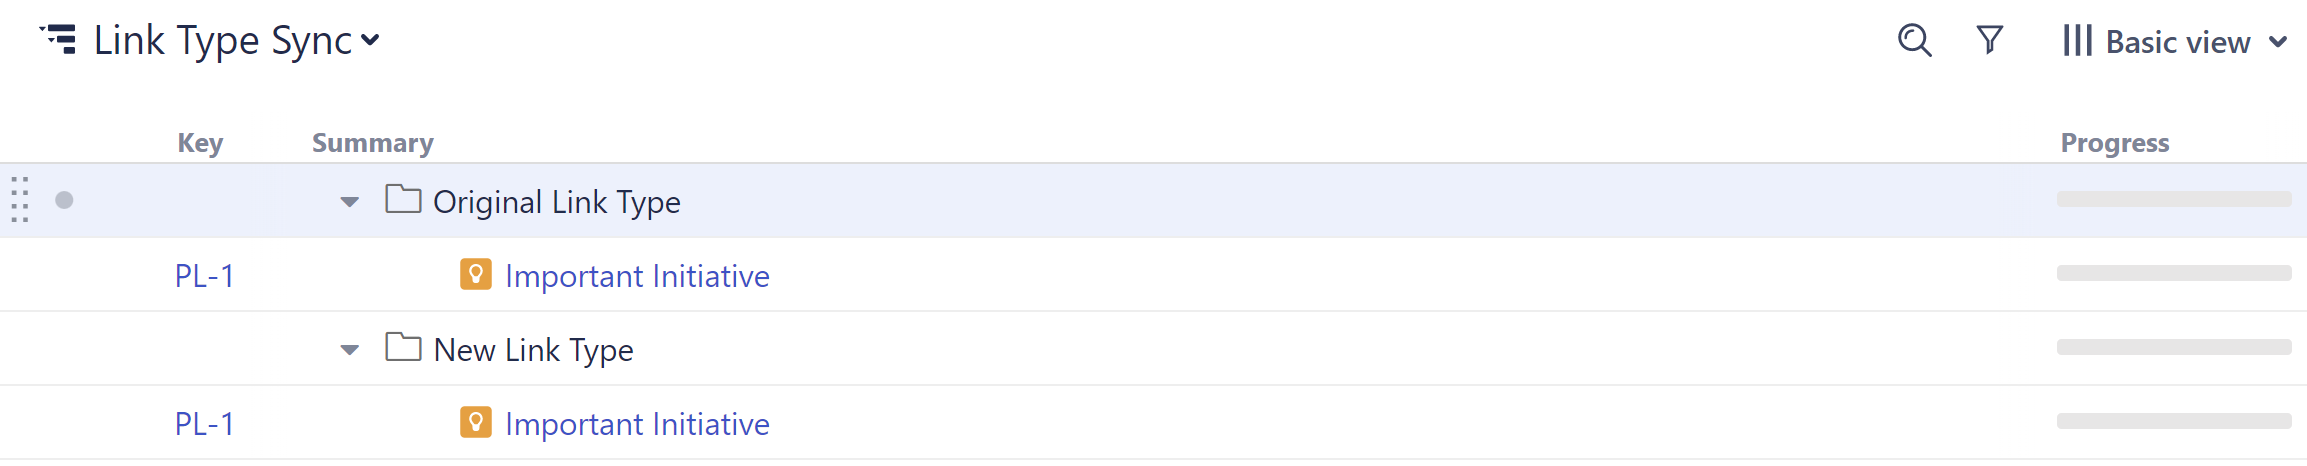
Step 2: Add Epics
- Highlight the Original Link Type folder and add a Linked Issue generator: +Add | Extend | Linked Items | select the inconsistent link type
- Highlight the New Link Type folder and add a Linked Issue generator: +Add | Extend | Linked Items | select the desired link type
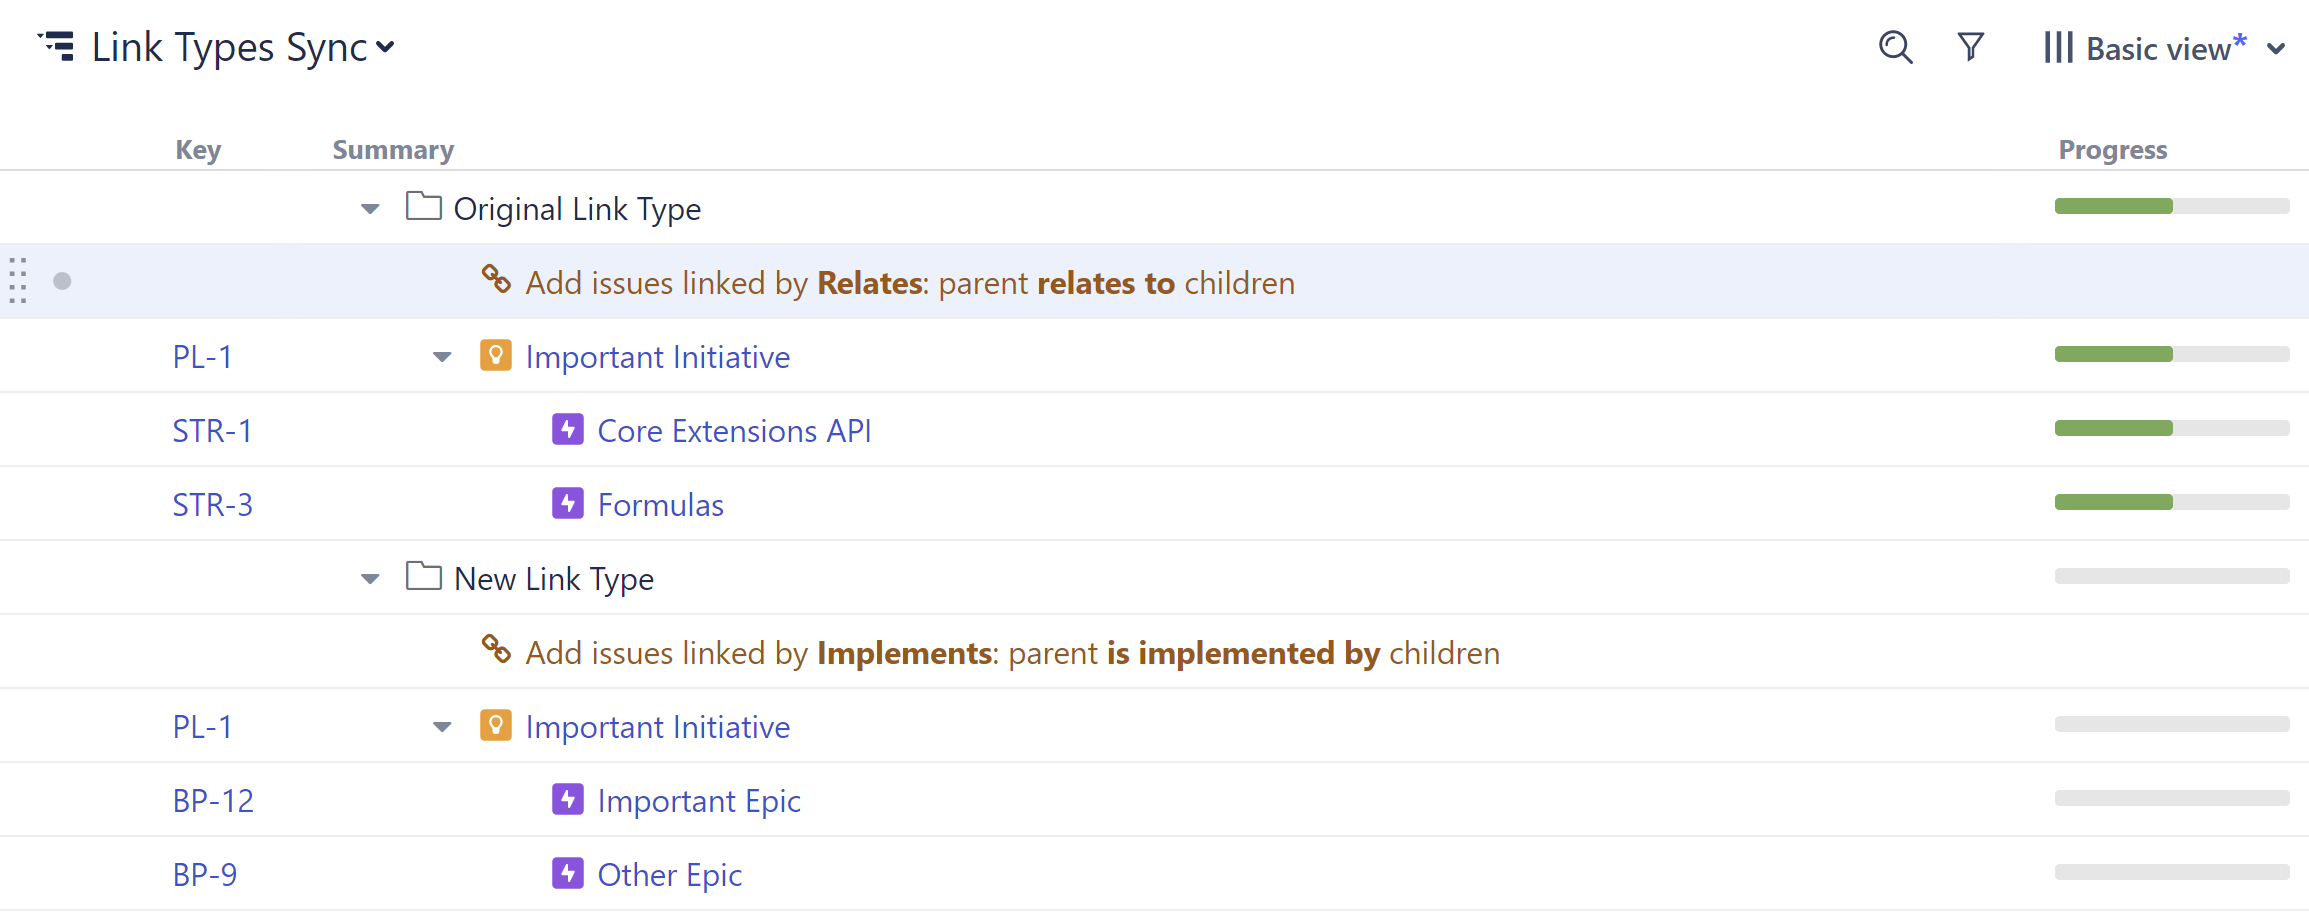
Step 3: Update Link Types
Select all the issues under the generator added to the first folder, and drag them to the second folder, as children of the same initiative.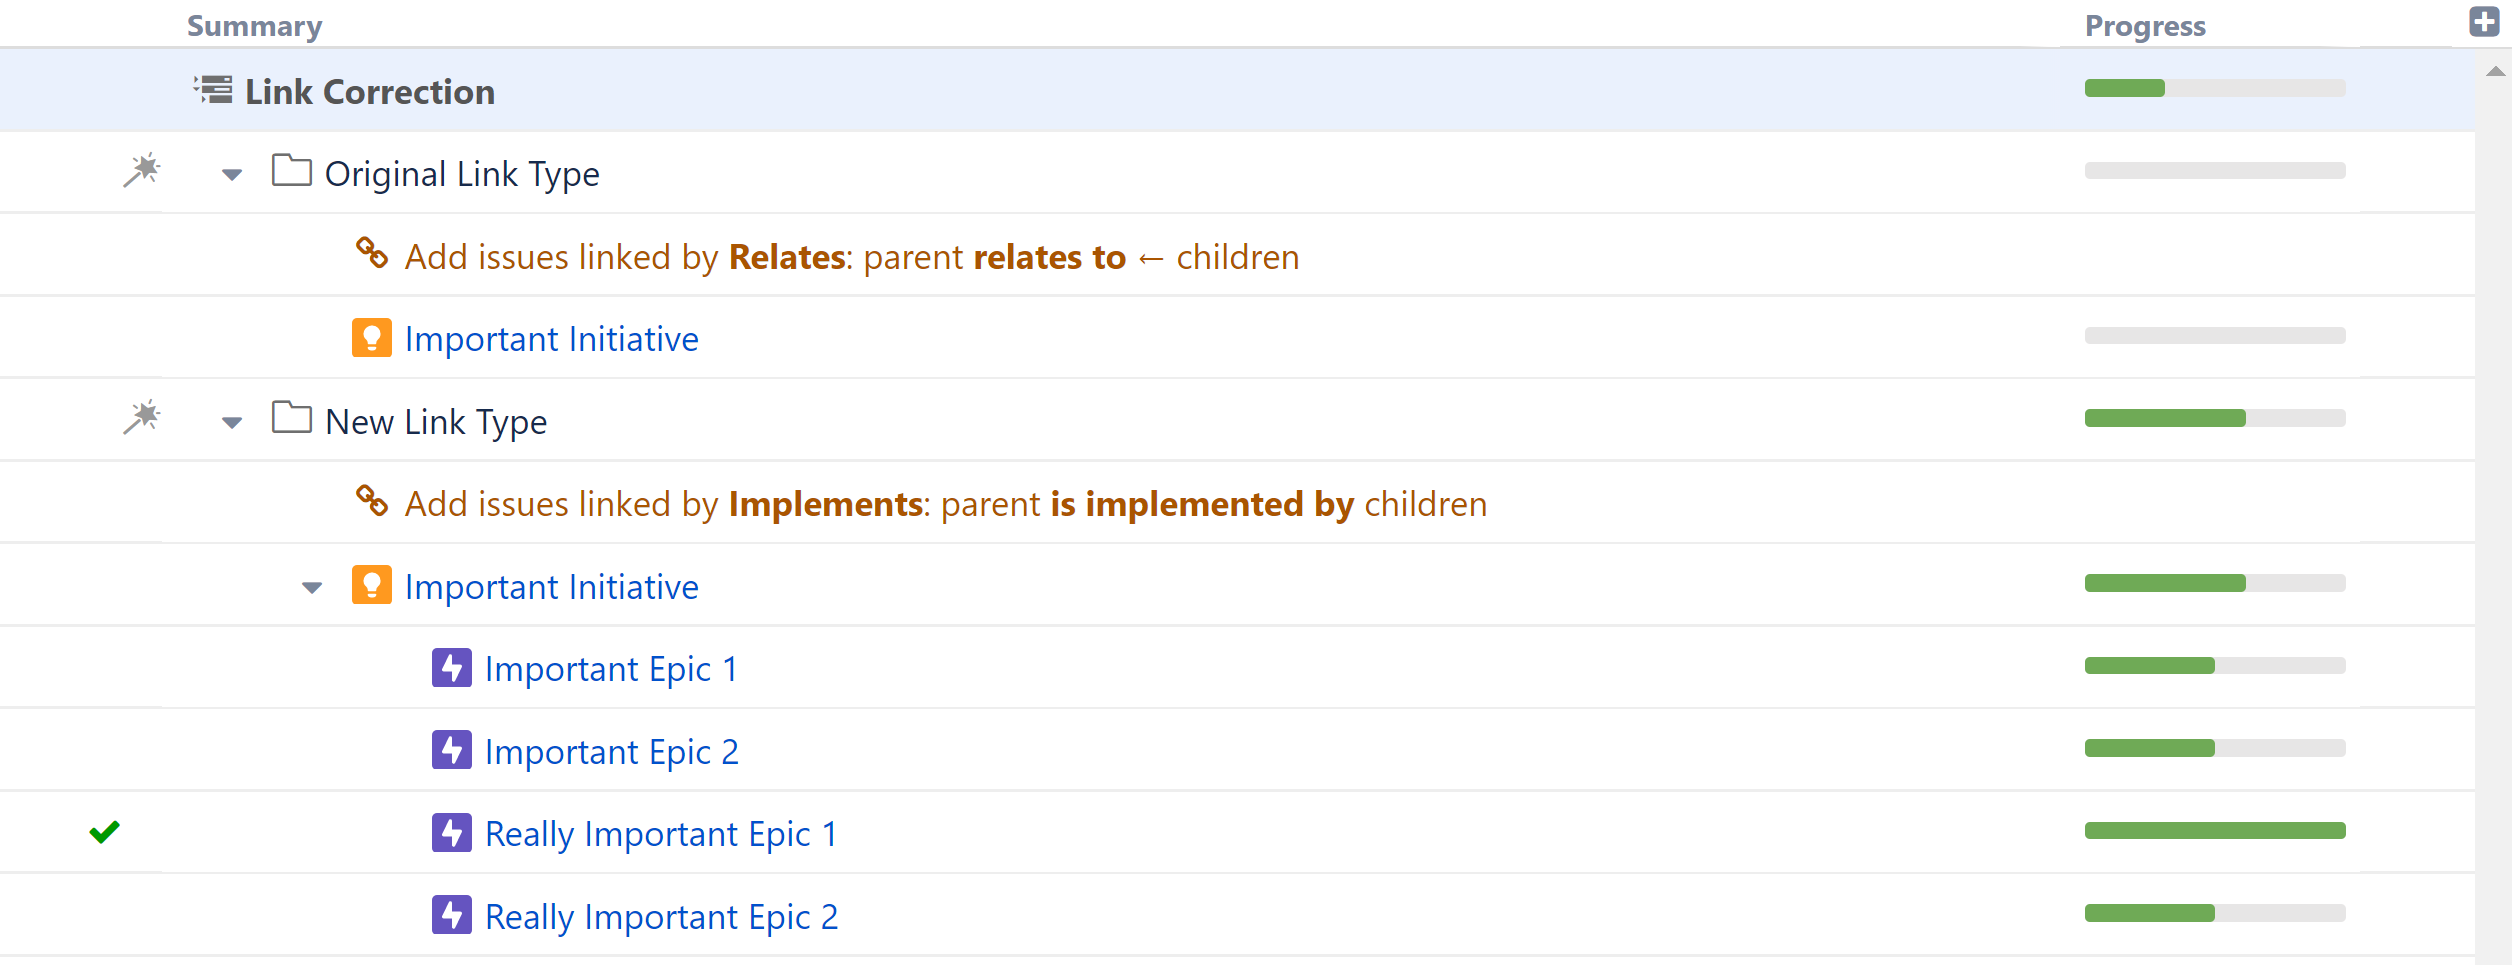
Structure will automatically replace all the old links with the new link type.
Additional Use Cases
You can also use this same method to:
- Update other link types - just edit your Extend | Link generators and the original item added to each folder
- Remove links - include an empty folder (no Extend generator) and drag your linked issues to the empty folder - the original link will be removed without adding a new link
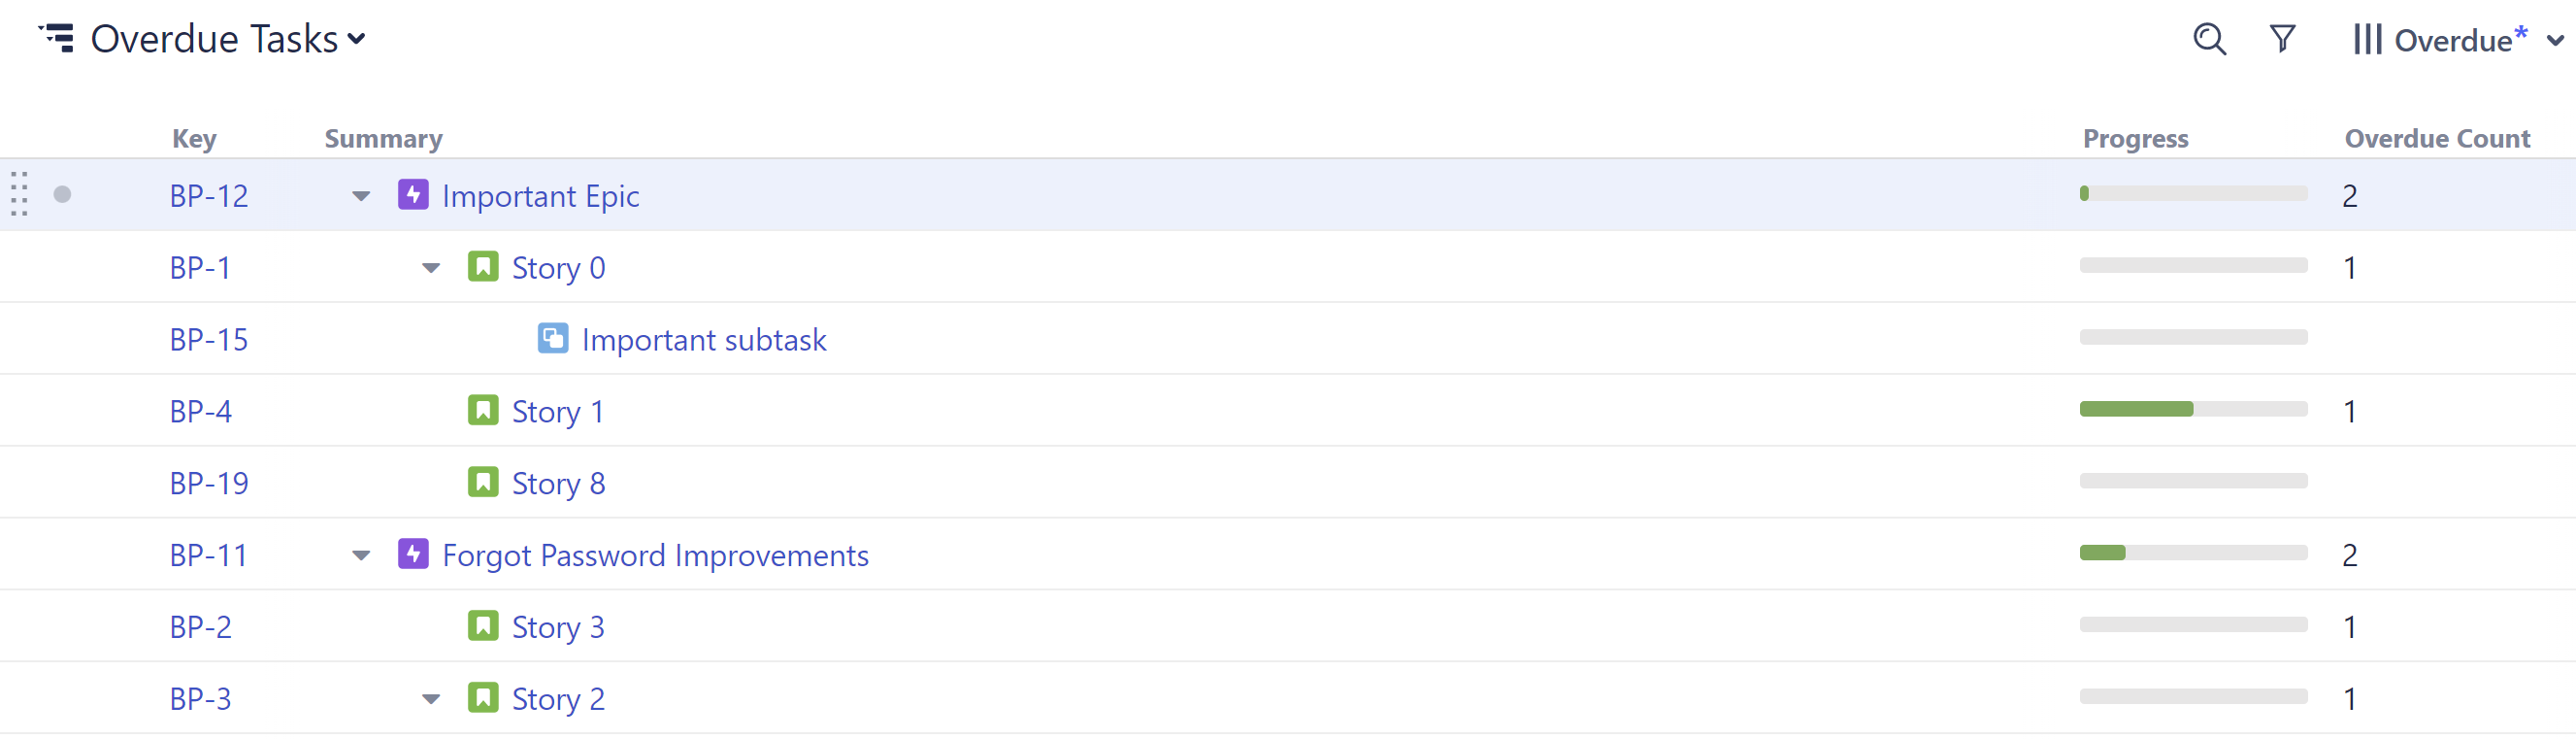
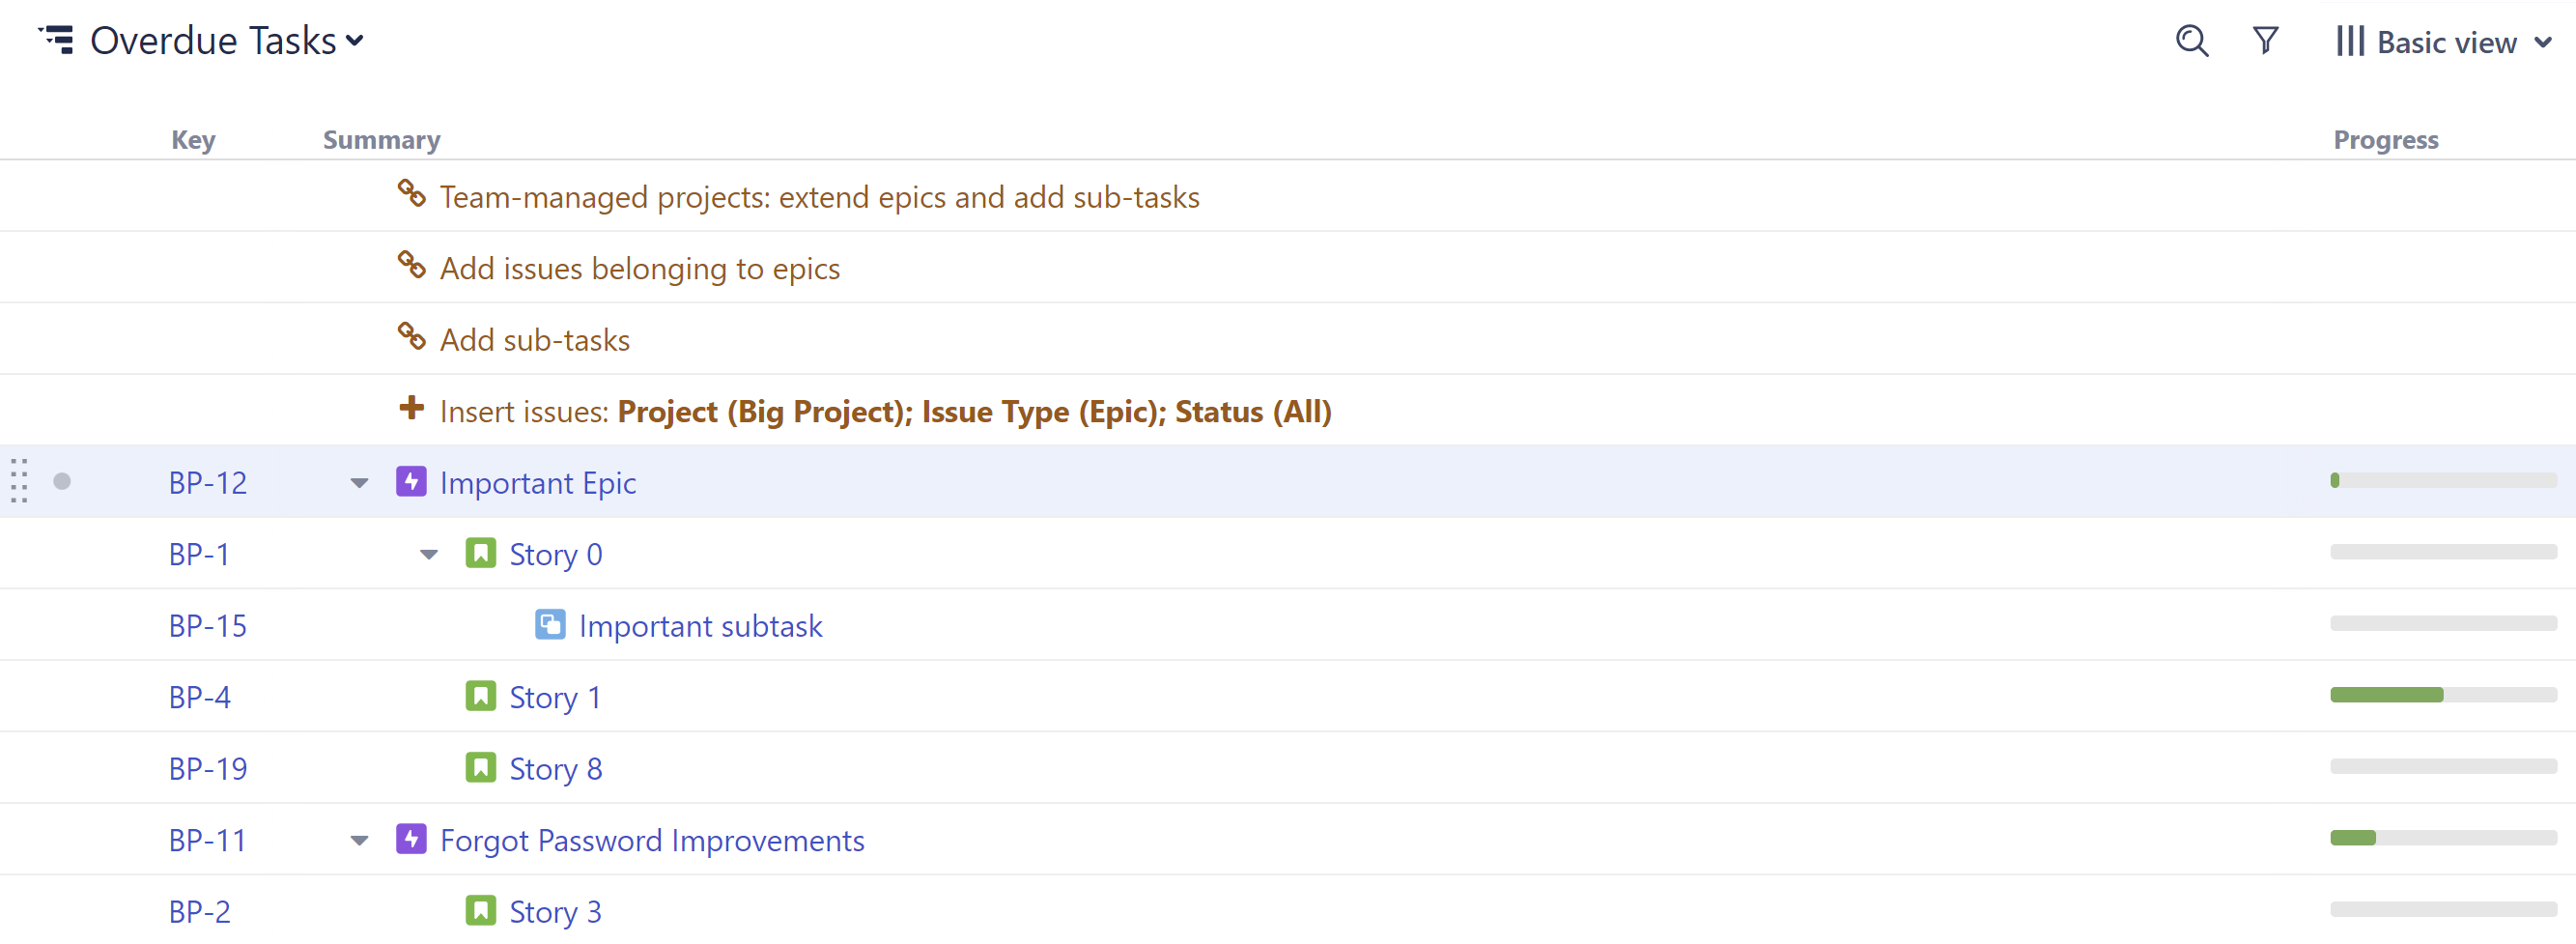
Use Structure to identify:
- Overdue tasks
- Number of overdue tasks per epic, initiative, or other larger grouping
Step 1: Build Your Structure
In this guide, we're going to show you how to track overdue tasks at the epic level. To track overdue tasks for initiatives or any other large groupings, simply reconfigure the structure hierarchy - this can be done using a Preset or Insert, Extend, and Group generators.
To create a new structure using a Preset:
- Open the Structure Selector menu and select Create New Structure
- Automatically build an Epic > Story > Sub-task hierarchy: +Add | Preset | Agile Hierarchy
To create a new structure using Insert, Extend, and Group generators:
- Open the Structure Selector menu and select Create New Structure
- Add epics: +Add | Insert | Basic Insert | open the Issue Type dropdown and select Epic
- To limit the epics to specific projects, use the Projects dropdown
Add stories and sub-tasks: +Add | Insert | Child Issues | under Add, select Issues under epics and Sub-tasks.
Step 2: Mark Overdue Tasks
Once you have your structure in place, the next step is to identify all the overdue items. To do this, we need to add a formula column. Click the + button to the right of the column headers, and select Formula. 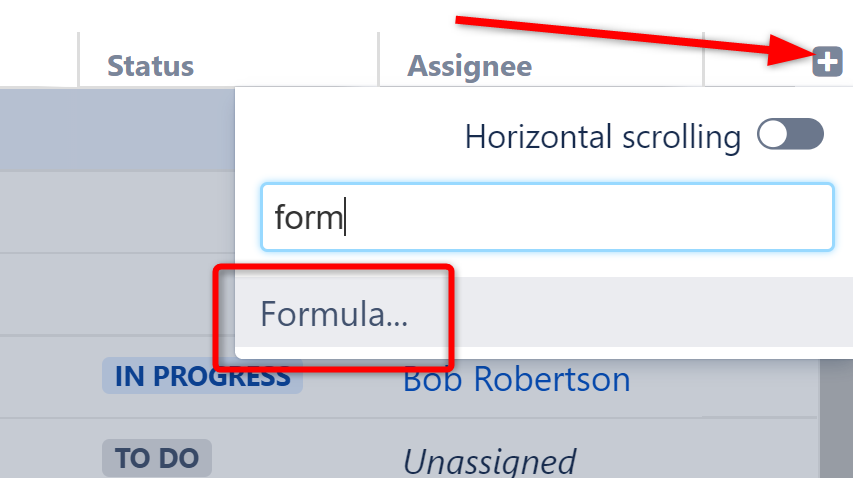 Give the column an appropriate name and enter the following into the Formula section:
 IF(due_date < today(); "overdue")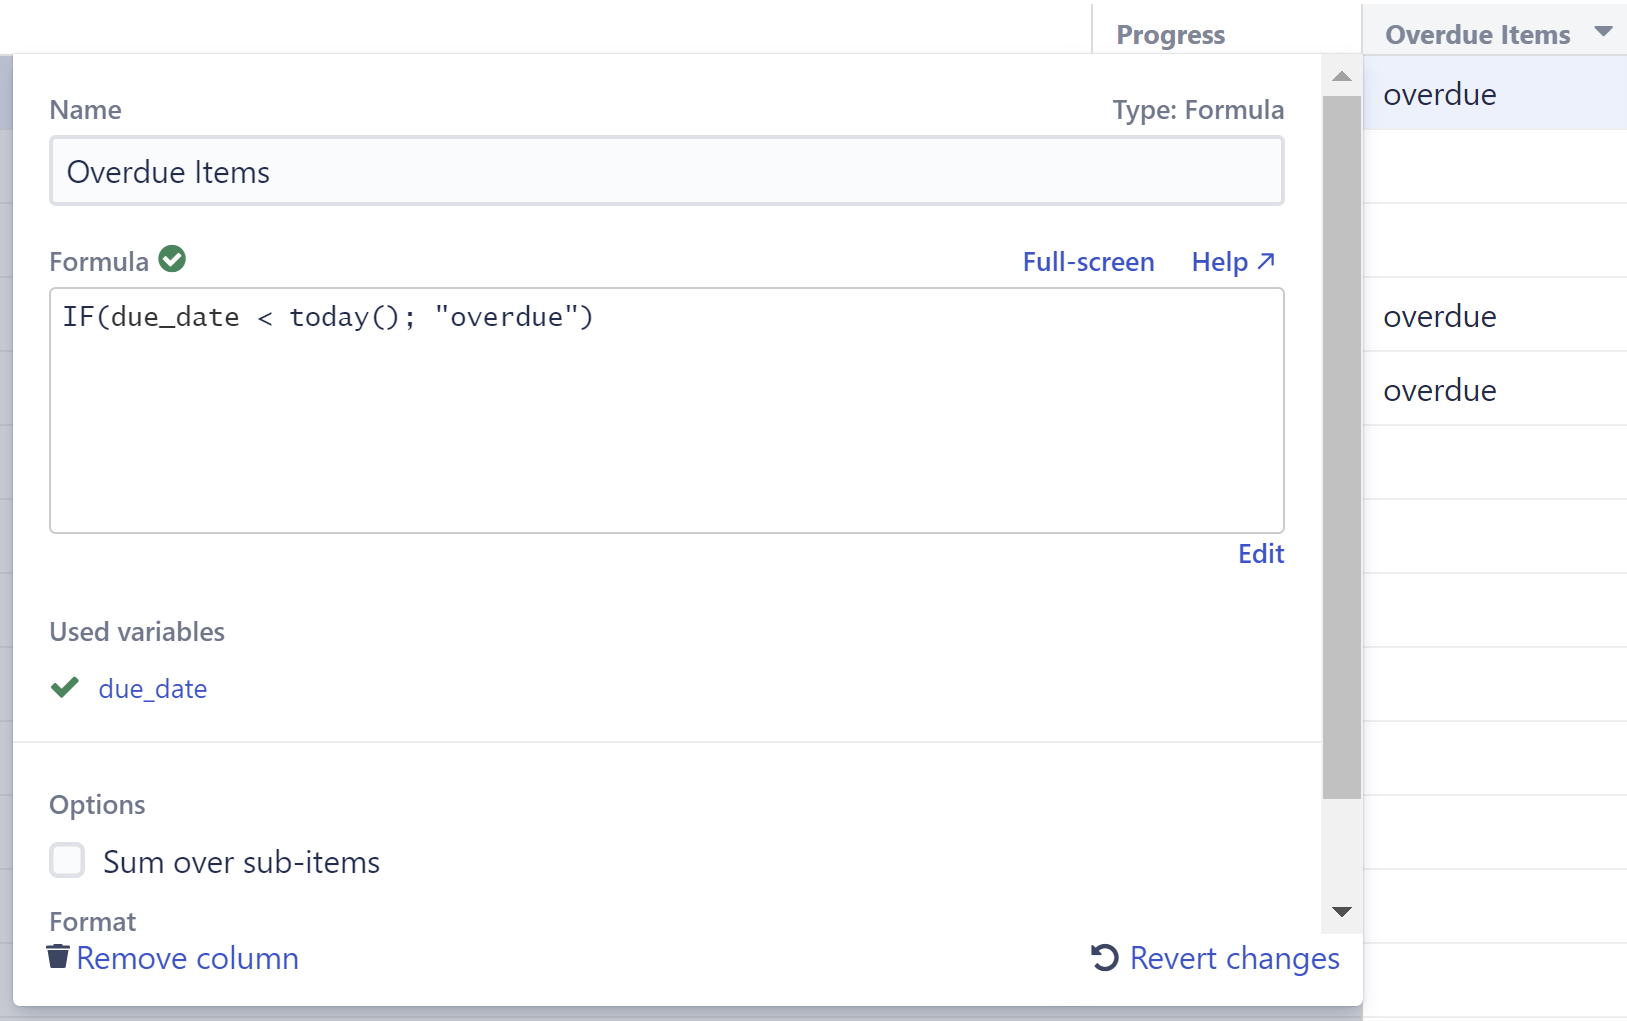
Variations
This is just one way to mark overdue items. You could also:
- Create a more visual warning that highlights not only overdue items, but also items coming due. You can read how to do this in Markdown in Formula Columns.
- Create a formula that relies on another due date. For example, you may want to flag issues that aren't completed by the due date of their parent epic. In this case, change the formula to:
IF(type = "Story" and status != "Done" and parent{due_date} < today(); "overdue")
Step 3: Aggregate Overdue Items for Epics, Initiatives, etc.
In the previous example we were simply returning the string “overdue”, but if we give that "overdue" flag a numeric value ("1"), we can use the Sum over sub-items option to aggregate those values up the hierarchy. To accomplish this:
- In place of the formula we created in step 1, enter the following:
IF(type = "Story" and status != "Done" and due_date < today(); 1) - Check the Sum over sub-items box