Program Manager
Requirements
For this method to be successful, you need:
- All stories and tasks assigned to specific Jira users
- A custom User property containing each user's hourly rate of pay (we've named ours "cost")
Step 1: Build a Hierarchy
Build a structure with an Epic > Story > Sub-task hierarchy:
- Go to the Jira menu and select Structure | Create Structure
- Add epics: Automation | Insert | JQL Query and enter the following JQL query:
issuetype = Epic- To limit the epics to specific projects or other variables, add additional specifications (Example:
AND project = "My Epics")
- To limit the epics to specific projects or other variables, add additional specifications (Example:
- Add stories: Automation | Extend | Stories under Epics...
- Add sub-tasks (optional): Automation | Extend | Sub-tasks...
Step 2: Add a Column for the Custom User Property
- Open the Add Column menu (+) and select Attribute...

- Under the column properties, enter the following values:
- Attribute: User Property...
- User Field: Assignee
- Property: Enter the key for the user property where you store each user's hourly pay rate - ours is called "cost"
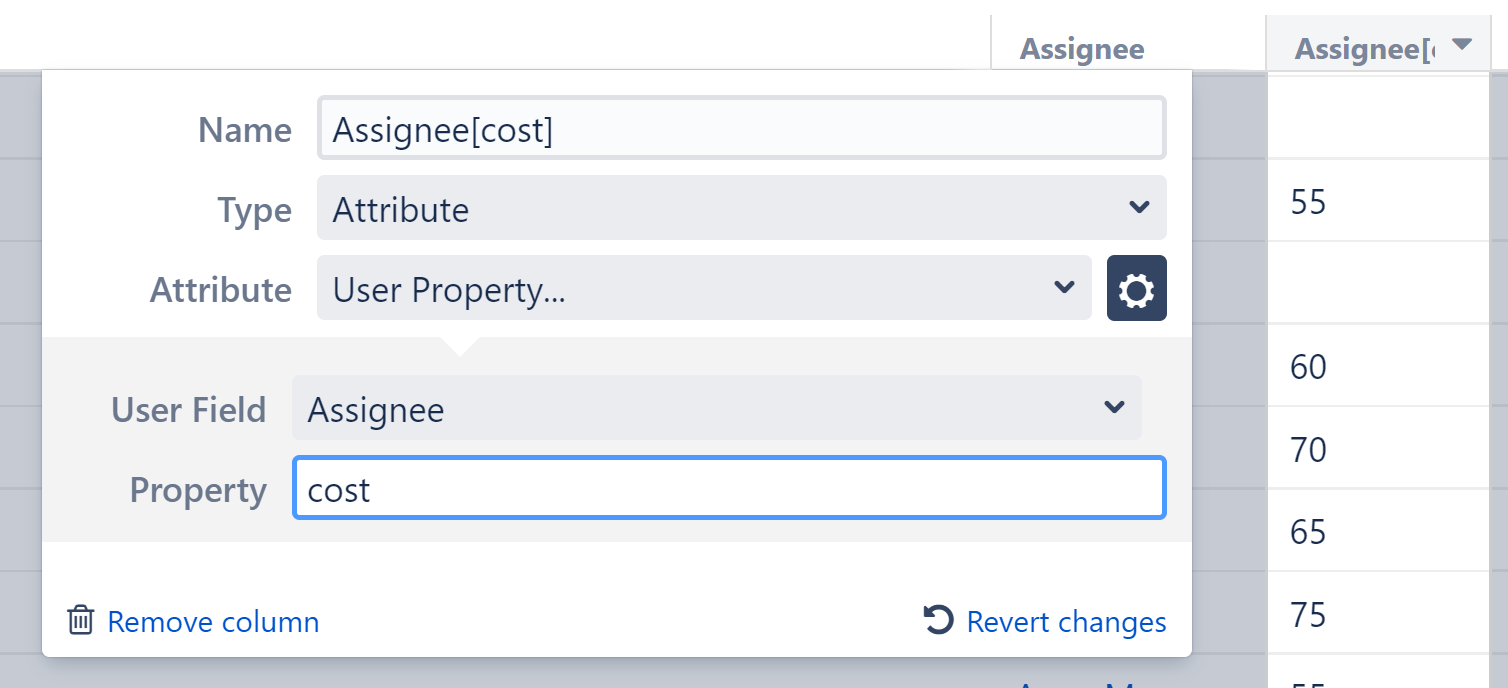
You should now have an Assignee(cost) column that displays the values from our custom user property:

Step 3: Calculate the Cost to Finish Each Issue (epic/story/etc.)
Add a formula column to calculate the cost to finish each issue in our structure. Enter the following:
- Formula:
AssigneeCost*RemainingEstimate/3600000 - Variables: map AssigneeCost to the custom "cost" property we discussed in Step 2 - see Columns as Variables for more details
- Check Sum over sub-items so the cost is aggregated up the hierarchy
- If issues or tasks appear multiple times within an epic (or other grouping), check Exclude deplicates to avoid an inflated total costs

Bonus - Make This Information Visible Outside of Structure
Using Effectors, we can write the values from our formula to a custom Jira field, making them visible to users outside of Structure.
Before we start, you'll need to make sure you have a custom field where the Cost-to-Complete values can be stored. We created a custom field called "FinishCost".
Add an Effector
Open the Automation menu and select Effectors.

Choose Attribute to issue field...

On the Effector settings screen:
- The name field is updated automatically as you select the Effector properties. If you prefer, you can also click the edit button to enter a custom name.
- Get Value From: select the formula column we added in Step 2
- Set Value To: select the custom Jira field you want to write the cost-to-complete values to
- Limit To: If you only want to write cost data for certain issues or issue types (for example, just for epics), enter the appropriate JQL. We've left this section blank, because we want to write values for all issues.
- Select whether email notifications should be sent when the Effector writes values to Jira

When you're finished, click Save and Run to run the Effector immediately, or click Save to simply add the Effector to the structure but not run it yet.
Run the Effector
You can run an Effector directly from its settings screen (see above), or you can locate the Effector at the top of the structure and click the Action button (the three dots to the right of its row). Select Run.

You have the option to Preview effects before applying. This allows you to view and approve every change that will be made by the Effector. Effectors update live Jira data, so we highly recommend using the preview option. Click Run to begin.

Once the preview is finished, you will see a list of changes that will be made by the Effector. You can select which changes you want made, or click Apply All to apply all changes.

Once you apply the selected changes, the cost values from your formula column will be written to the custom Jira field, where they can be viewed outside of Structure.

With Structure, you can easily create a visual overview of your projects – and visualize all the data you need to track on a single screen.
Step 1: Build Your Structure
To create a new structure:
- Go to the Jira menu and select Structure | Create Structure
- Add the issues you want to track – you can add them manually or automatically using Automation | Insert
- Add related issues - you can do this using Automation | Group and Automation | Extend
Step 2: Add Data
- Jira fields, such as status, assignee, sprint, or remaining estimate
- Progress - track status based on issue progress, percent completion, or resolution
- Tempo Work Logged - track how long your team is spending on each issue
- Formulas - create your own formulas to compare fields or create a visual report
Time in Status - see how much time issues spend in a particular status
Last Comment - view the latest comment for each issue

Once you've added your columns, you can aggregate the data up the structure. To do so, open the column you want to aggregate and select Sum over sub-items.
Looking to visualize your structure data as a chart or other report? Our integration with Custom Charts for Jira makes it easy to build customizable charts from your structure data. Learn more
Step 1: Build a SAFe Structure
To create a structure for SAFe:
- Go to the Jira menu and select Structure | Create Structure
- Add initiatives: Automation | Insert | JQL Query | enter the appropriate JQL, such as
"Project = 'project name' AND issuetype = initiative" - Add epics below initiatives: Automation | Extend | Linked Issues | choose the type and direction used to assign Epics to Initiatives, such as "Implements" or "parent is Implemented by sub-issue"
- Add issues belonging to epics: Automation | Extend | Stories under Epics
- Add sub-tasks: Automation | Extend | Sub-tasks
- Sort by rank: Automation | Sort | type "Rank"
Step 2: Add Data
- Jira fields, such as status, assignee, sprint, or remaining estimate
- Progress - track status based on issue progress, percent completion, or resolution
- Tempo Work Logged - track how long your team is spending on each issue
- Formulas - create your own formulas to compare fields or create a visual report
Time in Status - see how much time issues spend in a particular status
Last Comment - view the latest comment for each issue
Once you've added your columns, you can aggregate the data up the structure. To do so, open the column you want to aggregate and select Sum over sub-items.
Take SAFe management to the next level
By adding Structure.Pages, you can manage your Strategy documentation and linked issues all in one place.
The following guide will walk you through an advanced SAFe implementation in Structure.
Requirements
To do this, you will need:
- Jira Software and Confluence
- Structure
- Structure.Pages
- Structure.Testy
Ready-to-use demo space: Live Demo
Before You Begin
We assume that your Jira is prepared for scaling. The most common configuration is to create separate projects for each level:
- Kanban project for Portfolio level, with the following Epic issue type and statuses: Funnel, Reviewing, Analyzing, Portfolio Backlog, Implementing and Done
- Kanban project for Solution level, with the following Issue types: Capability and Enabler
- Kanban project for Program level, with the following issue types: Feature and Enabler
Features are named "Epics" in Jira, so you can rename them in Administration. Projects for each Team (Scrum or kanban, Scrum is preferable) and Issue types (User Story, Bug, Improvement, Enabler) can be left as is.
Step-by-step guide
- Define your company Strategy in Confluence
Create a Space in Confluence for high-level documents and describe the Strategy of your company. - Define Themes
Define Strategy more precisely by dividing it into several themes, each a sub-page of Strategy. - Link Themes to Epics
Define Epics, or high-level tasks for implementing your theme. Link Jira issues with their corresponding themes in Confluence. - Add Capabilities
Since you have a separate project for Capabilities, divide your Epics into more precise Capability issues and put them into a Capability Board. Don't forget to link each Capability with a corresponding Epic! You can use standard Jira issue link types, but it will be more convenient to create you own "implements"/ "is implemented by" link type. - Add Features
Add details to any large Capabilities and divide them into Features. Don't forget to link each Feature to its corresponding Capability. - Stories
Each Feature can be divided into more detailed Stories. Don't forget to link Features and Stories with an epic link. - Sub-tasks
If you need more detailed tasks, divide Stories into Sub-tasks. - Put it all together with Structure
Create an empty Structure and visualize everything in one place: http://recordit.co/lFYAzeBezV
- Find your Strategy page and add it to the Structure: http://recordit.co/0vt6mNYsqR
- Click the Automation button to enable automation. Then click the + icon next to the Automation button, and use the Extend generator to add the following rules:
- Add all child pages (extend | child pages): http://recordit.co/5l5fqPM4c3
- Add issues linked to pages
- Add Capabilities linked to Epics
- Add Features linked to Capabilities
- Add Stories linked to Features
- Add add Sub Tasks linked to Stories - Take it to the next level!
Now that your structure is created, you can modify it to fit your needs:
- You can Group issues on a specific level. For example, group by Sprint on the Team level to track progresses.
- You can prioritize issues by sorting by WSJF.
- You can specify your Objective during PI planning in Notes.