Searching and Navigating through Issues
JIRA Client provides multiple ways to find issues you are interested in. The most simple way is using default queries located in the Navigation Area, and you can create your own queries using:
- Different types of distributions,
- ID search by issue key or URL in the search bar on the top of the Main window,
- Context-based text search in the search field on the top of the Main window,
- "In-results" search by pressing Ctrl+Shift+F (⌘ + ⇧ + F) in Issues table.
When running a query, JIRA Client does the following:
- Applies a filter that lets through only specific issues.
- Scans the local database and, if necessary, sends a request to remote JIRA server. If a request is successful, the query becomes synchronized meaning that the local database contains all issues that satisfy the constraints of the query.
To keep queries synchronized, JIRA Client performs periodical synchronization.
Sub-queries act much the same as usual queries, but they reside under another query in the Navigation Area. When you run a sub-query, you search for certain issues within search result of the parent query. By dragging-and-dropping queries you can apply similar search filters and distributions to different projects or even different connections.
In this section:
Finding a Specific Issue by Key and URL
To find an issue:
- Type or paste issue ID, number, or URL in the search bar, located on the top of the Main window, and press Enter.
The search is run, and found issues appear in the Issues table.
When running search, you can specify a search scope or, in other words, the extent of the search area. To do so:
- Press the Search Scope button
 .
.
On picture below, search everywhere option is selected, thus the Navigation Area is grayed completely, and Everywhere tooltip is displayed to the right of the search bar.
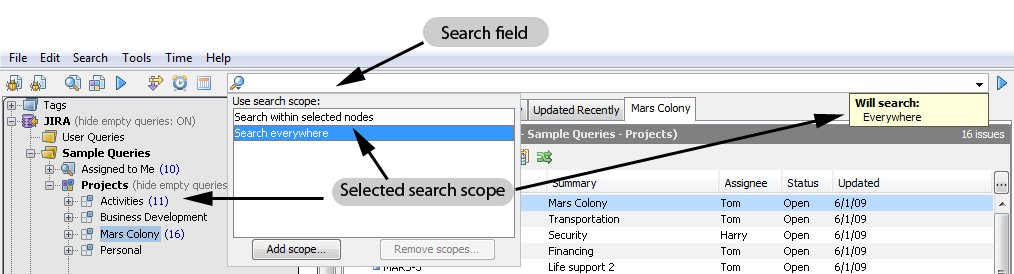
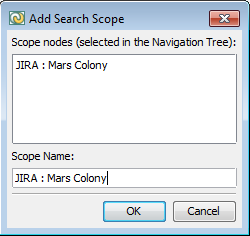
You can specify a different search scope to make your search more specific and restrict the query to this particular range. See an example on picture below.
Running Context-based Text Search
Context-based text search returns results only from certain range or scope of issues thus limiting a range of your search effect.
To run context-based search:
- In the Navigation Area, select a query, distribution, or a query folder.
- Select Search | Find menu item or press Ctrl + Shift + F (⇧ + ⌘ + F).
The search field opens above the Issues Table.
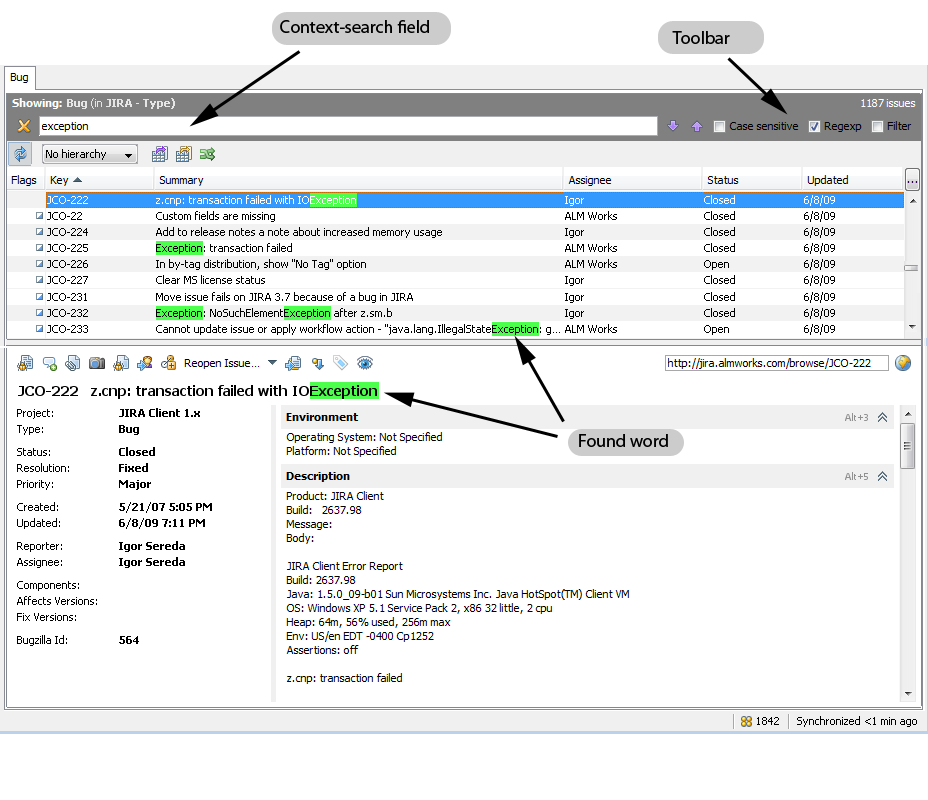
- Type a word or phrase to search for and press Enter.

Select the following options if necessary:
- Case sensitive to get the results exactly matching the case you type.
- Regexp to run context-based text search using regular expressions.
- Filter to sort out the search results.
If your search returned several results, press Next  and Previous
  buttons to navigate between them.
Creating Queries
JIRA Client lets you create queries using a desired variation of Boolean logic operators to establish relationship between search constraints. Table below provides a brief description of these operators.
Operator |
Description |
|---|---|
AND |
Use the AND operator to retrieve a set in which each citation contains_ all the search terms_. This operator places no condition on where the terms are found in relation to one another; the terms simply have to appear somewhere in the same citation. |
OR |
Use the OR operator to retrieve documents that contain at least one of the specified search terms. Use OR when you want to pull together articles on similar subjects. |
NOT |
Use the NOT operator to exclude the retrieval of terms from your search. |
Table below lists different types of icons you may come across when setting up search constraints.
Icon |
Description |
|---|---|
|
Search for specific words in a text attribute. |
|
Search for a numeric attribute having values within specified range. |
|
Search for issues that have specified values in a date attribute. |
|
Search for specific values in a single-value selection field. |
|
Search for specific values in a multivalue selection field. |


TBD: describe how issues are matched against single-value and multi-value selection field filters, in case filter contains 2 and more values.
To search for mutli-valued field value, combine search filters with ANDs (for example, fix version = 2.0 AND fix version = 3.0).
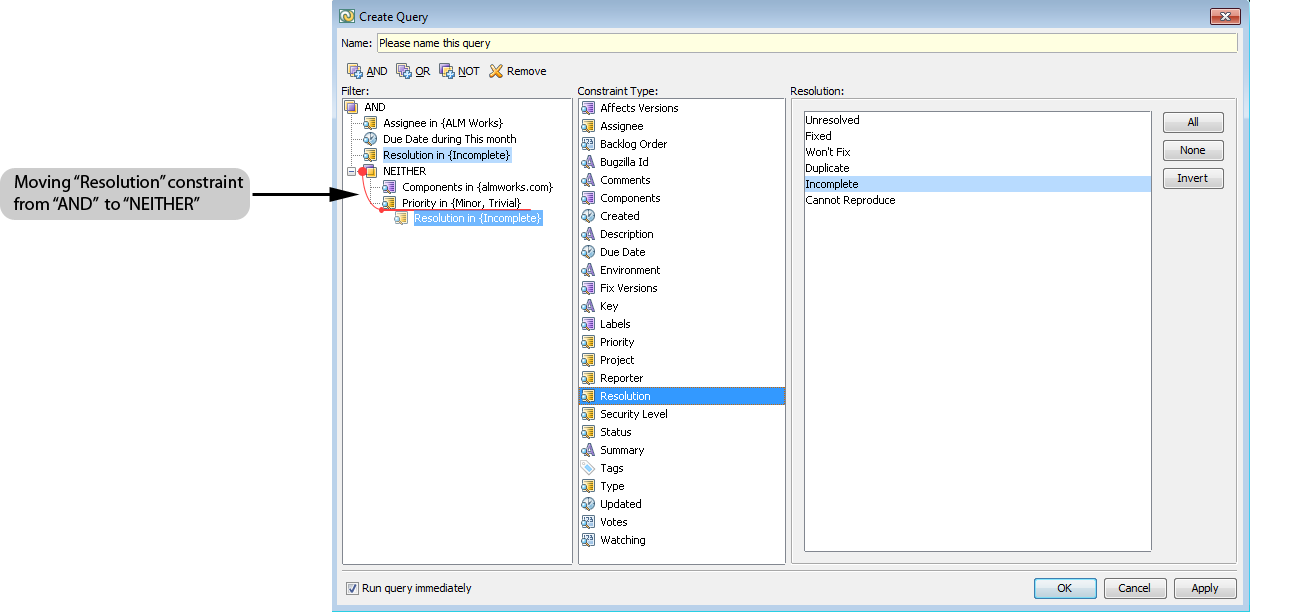
To create a query:
- Select Search | New Query menu item or press F3 (⌘ + F3).
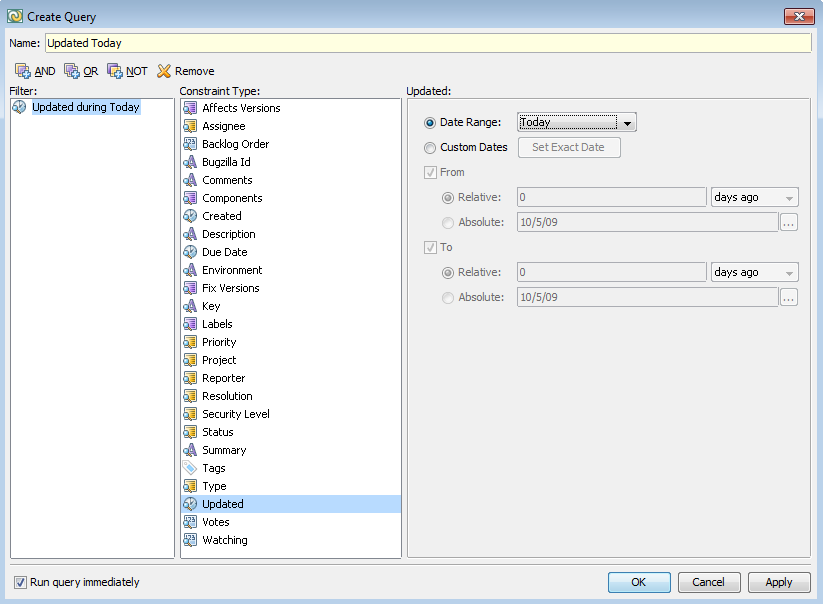
The Create Query window opens. - Select one or several search conditions. On example below, the following combination of conditions is used:
- Issues have "open" status,
- Issues are not updated during last 7 days,
- Votes for issues are in range from 20 to 100.
The tree of constraints shows how they are interconnected.

When selecting query constraints, you can drag-and-drop to arrange them in the constraints tree as shown below.
Here are some more examples of queries which you may find useful:
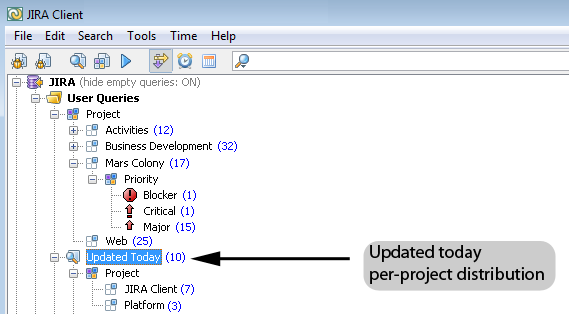
- Updated "Today"
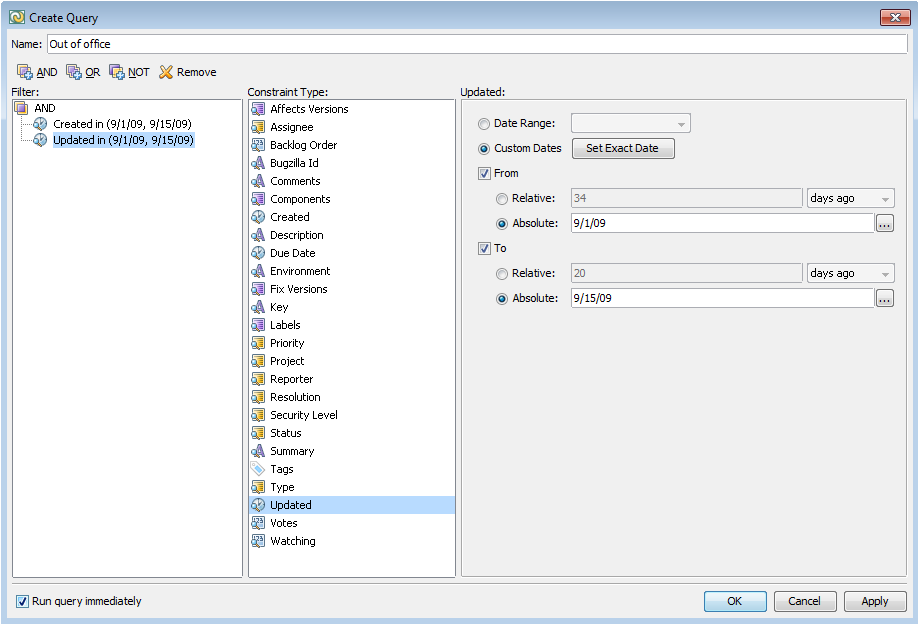
- Created and updated while you may have been away.
Sharing Queries
You can exchange queries with other JIRA Client users using an e-mail application or an instant messenger.
To share a query:
- Select a query or a query folder and press Ctrl + C (⌘ + C) or right-click and select Copy.
- Paste it into a letter (message) form of your e-mail program or a text editor, or an instant messenger to get an XML-formatted text.
To use a shared query:
- Select an XML text of the query and copy it into Clipboard.
- Open JIRA Client, navigate to some query folder and by press Ctrl + V (⌘ + V) or right-click and select Paste.
A new query appears in the Navigation Area.
Moving a Query to "Temporary Queries" Folder
If you want to change the parameters of a query which cannot be modified (this can be, for example, one of the sample queries), you can move it to Temporary Queries folder and modify it there. To do so:
- Select a query in the Navigation Area, right-click and select Flat Duplicate command.
The query appears in Temporary Queries folder, and you can now edit it.
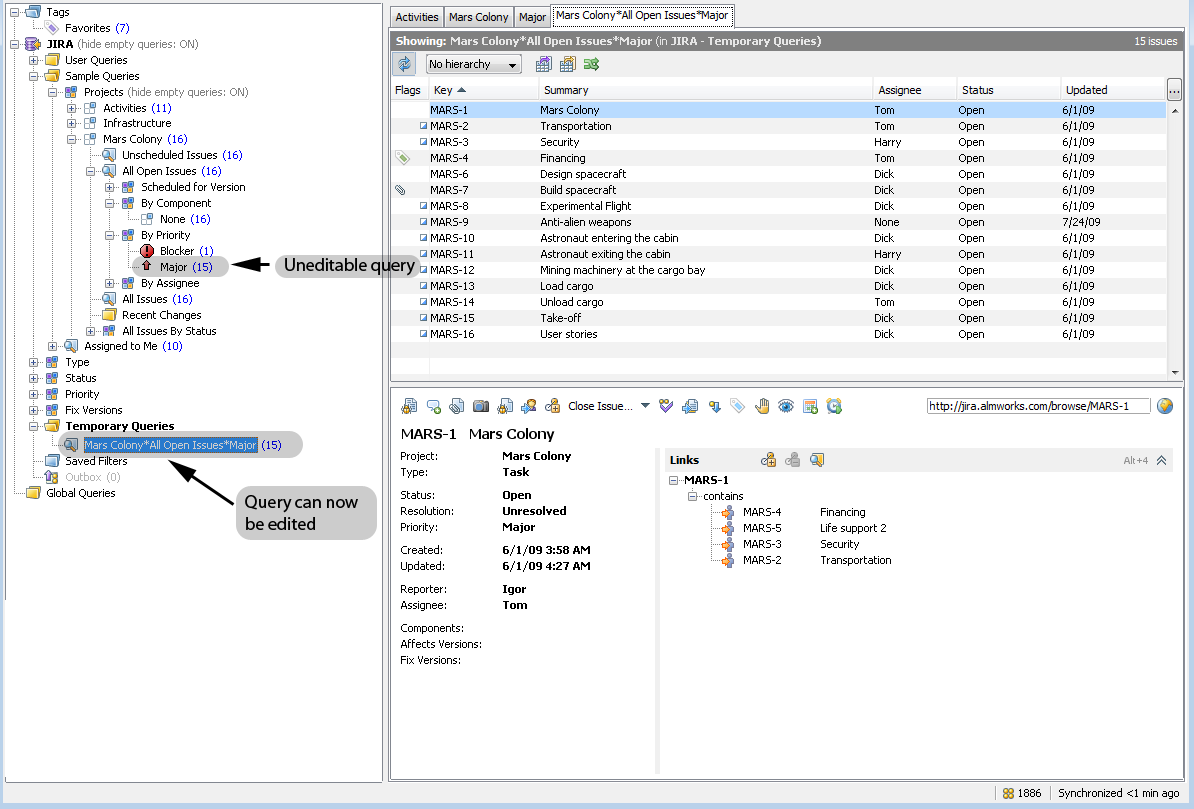

The query name changes listing its conditions separated with "*" sign.
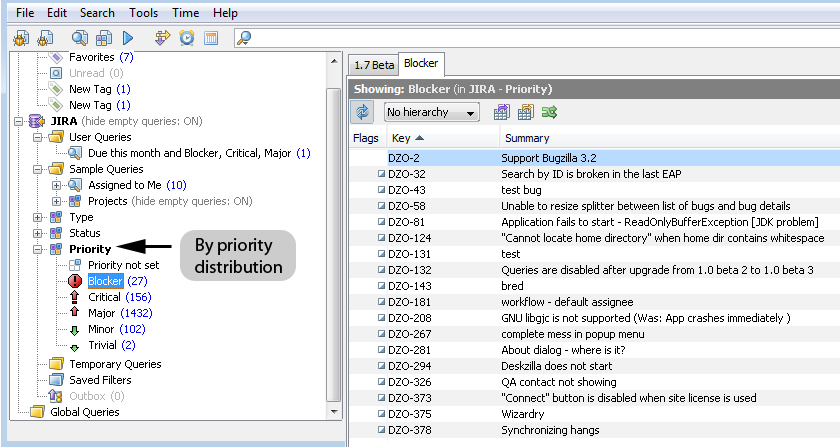
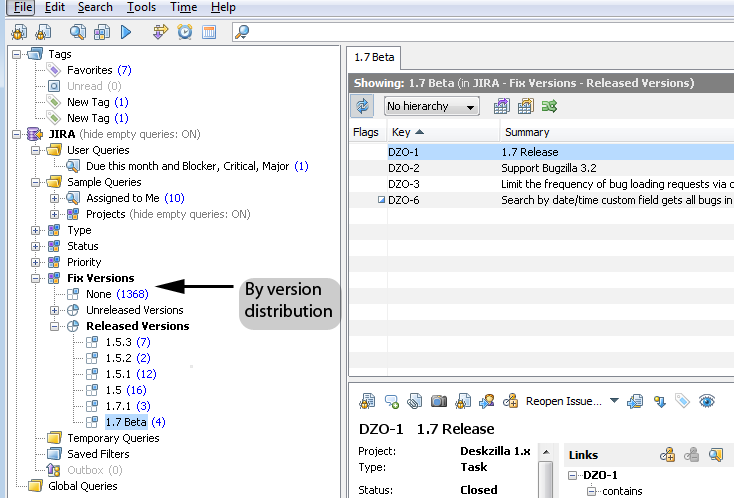
Creating Distributions
Distribution is a folder in the Navigation Area that maintains a list of sub-queries corresponding to all possible values in a given search field. Using distributions you can break down issues by status, assignee or any other desired attributes. JIRA Client creates and updates a list of sub-queries for each value of the attribute, for example:
- Priority
- Type
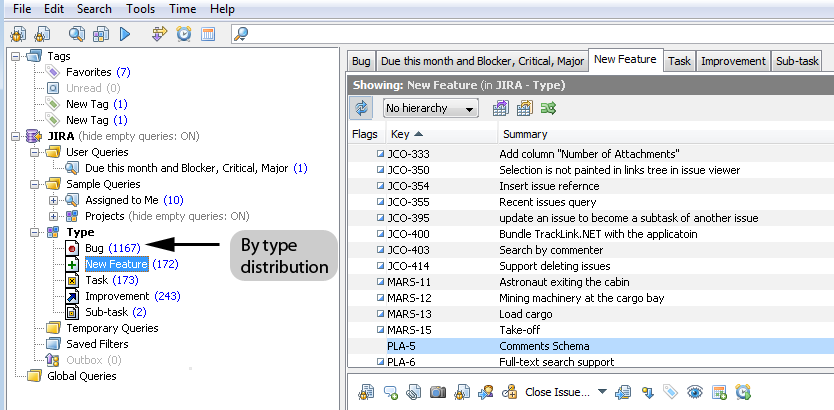
- Version
To create a distribution:
- Select Search | Distribution menu item, or click Create Distribution button
 on toolbar, or press Ctrl + D (⌘ + F4).
The Create Distribution dialog opens.
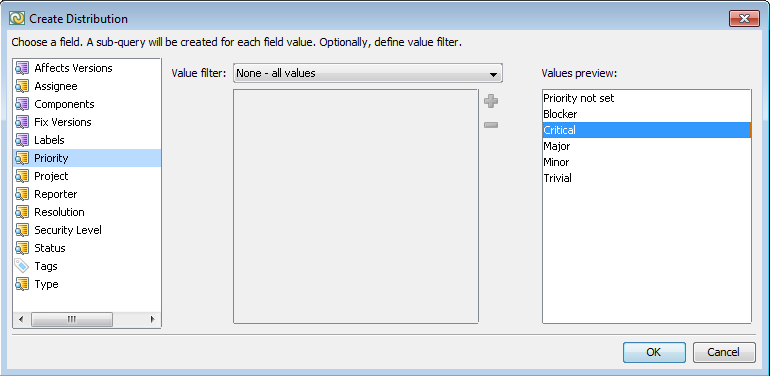
- Select a field for which you want to create a distribution.
A sub-query is created for each filter value; the distribution appears in the Navigation Area.
You cannot edit or move distribution sub-queries, but in all other aspects they act like ordinary sub-queries.
Creating Two-dimensional Distributions
Two-dimensional distributions let you break down query results in two different dimensions by selecting a parent query and two attributes for its axes.
To create two-dimenstional distribution:
- Select a desired query in the Navigation Area and click the Tabular Distribution button
 on a toolbar.
A two-dimensional distribution opens below the Navigation Area.
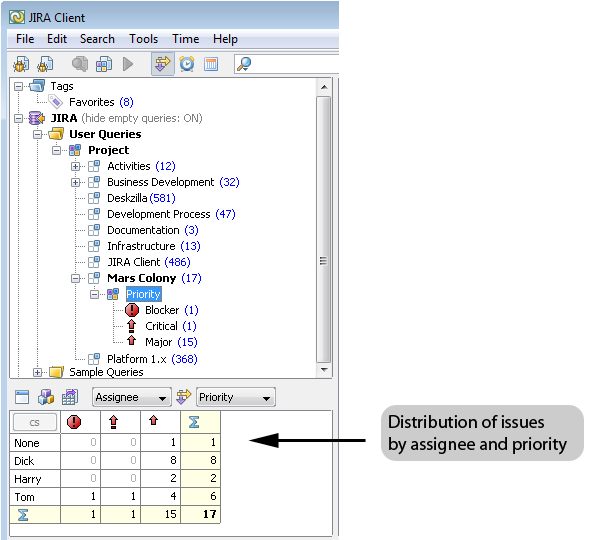
- Click a desired link with issues number to view them in Issues Table.
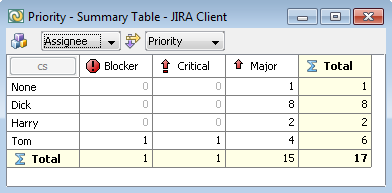
Click Open a window with a summary table button  to view the distribution of issues in a separate table. See picture below.
Creating Three-dimensional Distributions
To create a three-dimensional distribution:
- Create a two-dimensional distribution.
- Click the Configure Summary Table button
 on the Distribution area toolbar
 - In the Counters Configuration dialog which opens, click the Add Counter button
 to specify additional distribution parameter.
The Edit Filter dialog opens. - Specify a desired filter and click OK.
A filter appears in the Counters Configuration window and a 3-d distribution is created.
On example below, Status filter was selected as a third parameter for the distribution.
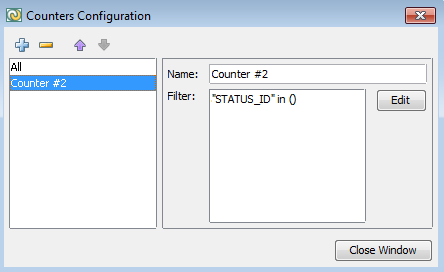
- Close Window button.
A three-dimenstional distribution opens below the Navigation Area.
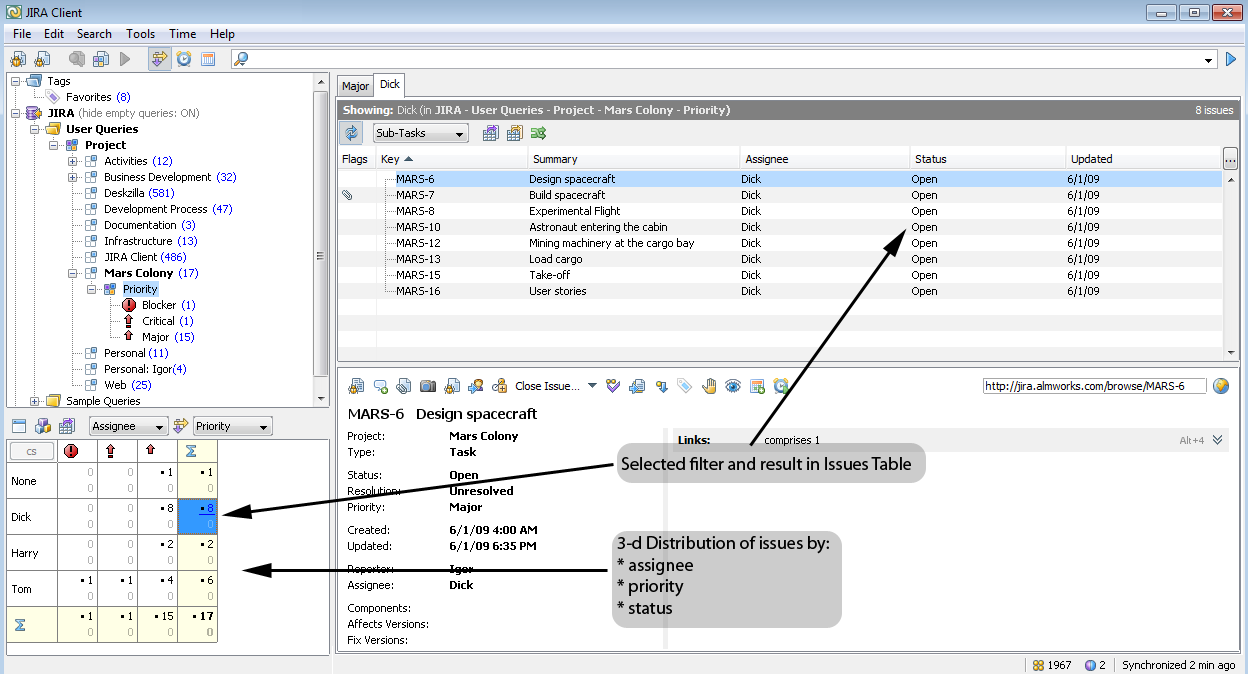
- Click a desired link with issues number to view them in Issues Table.
You can export the distribution results to CSV to print, view or analyze them in Microsoft Excel or Open Office.
See Also