Structure plugin lets you create new issues right in the structure widget or use standard "Create Issue" dialog and add newly created issue to structure automatically.
There are two modes of creating new issues, "creating from scratch" and "cloning". The mode used depends on whether Categories checkbox is selected on the summary editor shown above. When "creating from scratch", you can select the Project and Issue Type for the new project.
The selected options (creation mode, selected project and issue type for the "creating from scratch" mode) are remembered in the browser and are automatically suggested next time you create an issue.
Creating New Issues from Scratch
This is basically the same as using JIRA's Create Issue dialog.
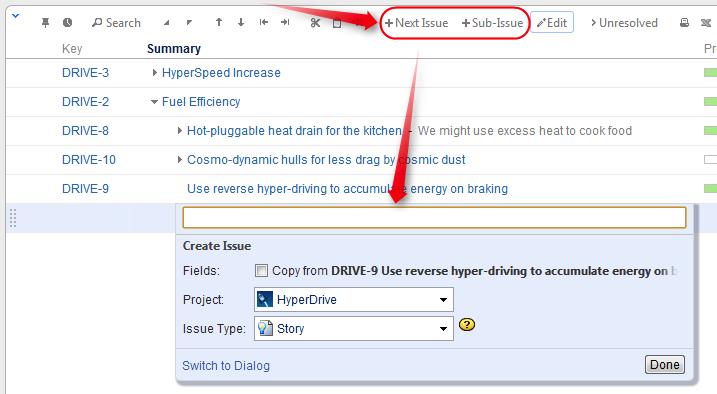
- Click +New Issue or +Sub-Issue on the toolbar (you can also hit Enter or Shift+Enter on the keyboard).
- Make sure Categories: Copy from... checkbox is cleared.
- Select Project and Issue Type.
Enter summary and, optionally, other fields before submitting the new issue.
To be able to edit other fields, you need to add the corresponding columns to your current view, before you start creating a new issue. Then, when editing a field, you can navigate to other fields by using Tab, Shift+Tab, or Ctrl+Alt+arrows keyboard shortcuts, or simply by clicking on a cell you wish to edit.
- Hit Enter or click Done to finish editing and create a new issue on the server.
- Hit Escape to cancel creating a new issue.
All fields that are not edited before you hit Done will assume their default values.
If some fields are required and do not have default values, and you send a new issue to the server without those required fields, the operation will fail – but you can fix it, just add the required fields as columns, edit the field values and hit Done again. The other way to achieve this is to use Switch to Dialog functionality and use standard dialog to populate issue.
You cannot create a JIRA sub-task from scratch in the structure widget. (This is about special issue type, not about creating sub-issues - you can create a new issue anywhere in the structure.)
Using "Create Issue" Dialog
You can click Switch To Dialog in any editor panel to display JIRA's Create Issue dialog, which lets to fill in fields not editable or not currently displayed in structure widget.
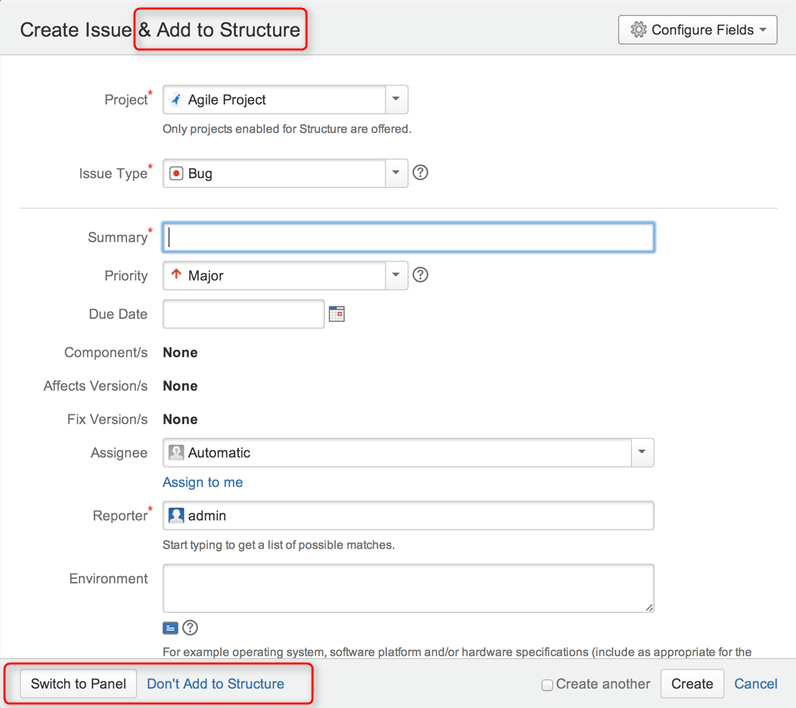
Once you're done, you can click Create and the created issue will be automatically added to the structure.
You can switch back to structure widget editor by clicking Switch to Panel, this will preserve all entered data and populate existing columns if possible. For other fields data will be preserved and sent back to server, once you click Done. You can also switch back to dialog mode at any time. The system will remember last used mode (dialog or panel) and use it next time you hit +New Issue or +Sub-Issue.
You can click Don't Add to Structure if you don't wish to add issue to the structure.
The standard Create issue button action has changed on structure widget page. Now it will open structure-enhanced dialog, allowing to add issue to structure immediately. This behaviour is indicated by the + sign.

On all other pages basic Create issue behaviour remains.
Cloning Existing Issue
The new issue becomes a "clone" of the selected issue - it has the same Project, Type and most other attributes, but you need to enter the summary for the new issue in the Summary field.
- Select an issue in the structure.
- Click +New Issue or +Sub-Issue on the toolbar (you can also hit Enter or Shift+Enter on the keyboard).
- Make sure Categories: Copy from... checkbox is selected.
- Enter summary and, optionally, other fields before submitting the new issue.
- Hit Enter or click Done to finish editing and create a new issue on the server.
- Hit Escape to cancel creating a new issue.
When you create an issue this way, it copies the following fields from the issue that was previously selected:
- Project and Issue Type
- Parent Issue if the cloned issue is a JIRA sub-task
- Component, Affects Versions, Fix Versions, Environment, Assignee, Priority, Security Level
- All custom fields that are required by the fields configuration for that particular Project and Issue Type
Please note that the archived versions are skipped when copying Affects Versions, Fix Versions and version-based custom fields.
Creating JIRA Agile (GreenHopper) Epics
GreenHopper 6.1 or later introduces the Epic Name custom field, which is required by default for any epic. To simplify the process of creating multiple epics in the widget, Structure will copy the new epic's summary to its Epic Name field, if the latter is empty. This way you can simply type an epic name into the Summary field, and proceed to the next issue. The copying only happens once, when an epic is created. You can change the summary or the epic name at a later time if you want them to be distinct. Of course, you can also add the Epic Name column to the table and enter new epic names explicitly.
Additional Keyboard Shortcuts
Immediately after you have hit Enter or Shift+Enter or Insert to start editing a new issue, you can also use keyboard to change the creation mode.
Use the following keyboard shortcuts while the summary field is still empty:
Enter or Tab | Cycle through Project, Issue Type and Summary field. When Project or Type field is selected, use arrows or start typing to select a project or type. |
Ctrl+Enter | Toggles cloning mode (Categories: Copy checkbox). |
| Alt+Enter | Switches editor to dialog mode and back to panel. |
If you already have entered the summary, you can use mouse to change creation mode, project or issue type.
Uploading New Issue to the Server
After you've provided the summary and pressed Enter, the structure widget displays only the Summary field for a short moment as it takes some time to actually create an issue in JIRA. After the widget receives the confirmation from the server that the issue has been created, other columns for that issue are loaded.
While the new issue is being uploaded to the server, you can start creating the next issue.
Using Edit Mode
Note that when you are creating a new issue, Structure widget is in the Edit Mode – you can also enter values for other fields besides Summary by clicking on the field to be modified, or using keyboard shortcuts. When you have hit Enter or clicked Done, the new issue will be created with those values you have entered.