To configure structure columns, position mouse pointer over the structure header for a second to have grid controls appear. These controls let you select which columns to show and how much space each column gets.

Structure header overview
When you add, remove or rearrange columns, you make adjustments to the View that's being used to display the structure. Adjusted view is marked with a blue asterisk (*). The adjustments are stored in your browser and affect only yourself – to make the changes persistent and available to others, you need to save the view or create a new view.
Adding Columns
To add a column, click on the + button at the right corner of the table header. A drop-down with available columns appears. To select the desired column, you can:
- use the mouse to find a specific column, or
- use keyboard arrow keys to select the column and hit Enter when done, or
- start typing column name and get the column list filtered, then use arrow keys if needed and hit Enter when done.
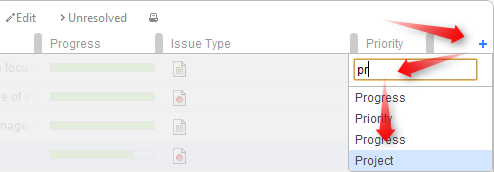
To abort adding new column, hit Escape.
Use keyboard shortcut TT to quickly open Add Column dialog (hit "t" twice).
Removing Columns
To remove a column, click on the x mark in the column header.
You cannot remove Summary Column or service columns.
Rearranging Columns
You can change position of a column by grabbing the column name with the mouse and dragging it to the left or right until the column position hint snaps into the desired location for that column.

Replacing a Column
You can change the field displayed in a certain column by clicking down arrow in the column header and selecting a different field in the same way you select a new column.

The effect is the same as if you had removed this column, added another column and moved it into the same position as the old column.
Resizing Columns and Autosize
Structure automatically tries to give all displayed columns enough space to display all information, but sometimes you might need to give more space to a column or two.
Column widths are not part of the View and are not saved on the server or shared.
There are a number of ways to change column widths:
- Grab the resizer and drag. When you hover your mouse over a column, the resizer that is responsible for that column's width grows darker and taller. When column size is close to what Structure considers ideal width (based on the displayed data), the resizer turns yellow and "snaps" to the perfect position.

- Hold CTRL and drag resizer. Works same as above, but without snapping. You can use it to fine-tune column width.
- Hold ALT (Option) and drag resizer. In this mode, you will redistribute the space between two adjacent columns - increasing the width of one column and decreasing the width of another. (This is how resizers used to work prior to Structure 2.0.)
- Double-click the resizer or the column header. The column will automatically assume the best size.
- Click "Autosize" icon (
 ) or double-click Summary column. All columns will be resized automatically based on the displayed data.
Structure columns always take 100% of the horizontal space available to the structure widget, no more, no less. After all columns sizes are determined, Summary Column takes all the remaining width.
If the browser window is too narrow or the structure widget has too little horizontal space, the resizing may not work exactly as expected because it becomes problematic to accommodate all the columns with all the data. In that case, consider removing some columns or giving the browser window more width.