You can view and edit structures directly from your Jira dashboard with the Structure Dashboard Gadget. The gadget can also be imported into Confluence and included on a Confluence page.
Adding Structure Gadget to Dashboard
Structure gadget is added as any other gadget: click the Add Gadget button in the top right corner of the dashboard, find "Structure" and click Add It Now. You need to have change permissions on the dashboard (if you don't have permissions to change the dashboard, you can try to create a copy using Tools | Copy Dashboard).
You can add several gadgets showing different structures on the same dashboard.
Configuring the Gadget
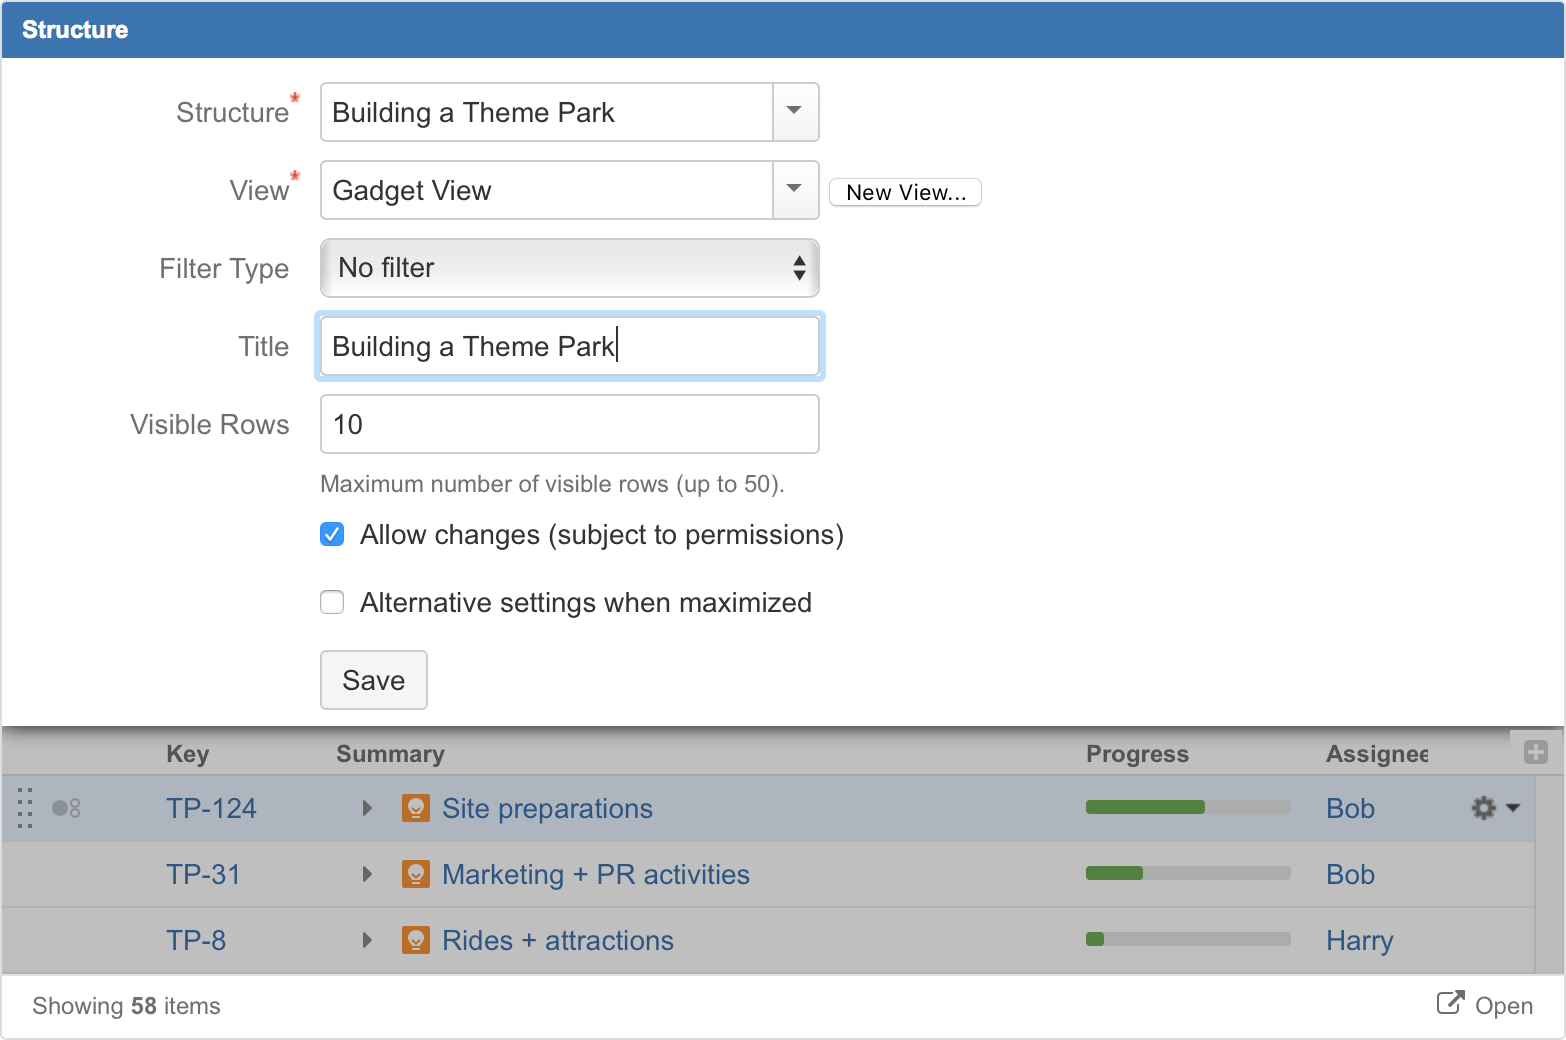
When you first add a gadget to dashboard, the gadget configuration panel appears with a dimmed preview of the gadget below. (The same panel is shown when you use the Edit command from the gadget header drop-down or when you edit macro with Structure gadget in Confluence.)
To configure the gadget:
- Select a Structure. Click arrow down in the Structure selector to view recently used and favorite structures, or start typing the structure name and let the drop-down suggest matching structures.
- Select a View. Click arrow down to choose from views associated with the selected structure, or start typing and let Structure suggest matching views. The selected view determines which columns the gadget displays. (You will be able to adjust the view later.)
- Optionally, configure a Filter. The displayed structure will be filtered in the same way as in the Structure Board – see Filter. You can choose between a simple text filter, JQL, S-JQL, or a saved JQL filter – see Search.
- Optionally, define the Title for this gadget. By default, it is the name of the selected structure.
- Decide how large the gadget is allowed to be and specify the number of Visible Rows. If there are fewer visible rows, the gadget shrinks; if more, a vertical scroll bar appears. Pick any number between 2 and 50.
- Decide if you'd like the dashboard viewers to make changes to the structure or issues (subject to the user's permissions) by selecting or un-selecting the Allow Changes checkbox.
- Optionally, decide if you'd like the gadget to have different View and Visible Rows settings when maximized. Select the Alternative settings when maximized checkbox to configure these parameters for a maximized gadget.
- Click Save.
Deselect Allow Changes to protect the structure from accidental changes, such as changes caused by drag-and-drop or hitting the Delete key.
It may be useful to have different View and Visible Rows settings when the gadget is maximized. In this case, you can use the wide screen of the maximized gadget's window optimally and see more information for the same structure. Select Alternative settings when maximized to configure these parameters.
Configuring Gadget View
There are several ways to configure view (columns) for the gadget.
- Select a predefined view from the drop-down.
Just select a view or start typing to allow Structure to suggest matching views. Set up other gadget parameters and click Save. Start with an existing view and modify it.
To use this method you need to have Update permission on the modified view.- Select a view in the gadget configuration panel.
- Click Save.
- Adjust view by adding, removing or rearranging columns – see Customizing Columns for details.
- A message "View has been adjusted. Save | Revert" will appear in the gadget footer. Click Save.
If the view you are changing is used in other gadgets, you will be modifying other gadgets' columns configurations as well.
- Start with an existing view, adjust it and save as a new view.
Use this method if you don't have Update access to the original view or want to continue using the original view for other gadgets' configurations.- Select a view in the gadget configuration panel.
- Click Save.
- Adjust the view by adding, removing or rearranging columns – see Customizing Columns for details.
- Open the gadget configuration again by clicking Edit in the gadget header drop-down menu.
- Click the New View button, located beside the view selector. An additional form appears – enter the new view name and click Create View.
- If this gadget is going to be visible to other users, make sure they have access to the view you've created. Gadget configuration panel will suggest to make this view public – click Let everyone use this view to make the view available to everyone.
- Start with a new view and adjust it.
- Without selecting a view in the gadget configuration panel, click the New View button.
- An additional form appears – enter the new view name and click Create View.
- If this gadget is going to be visible to other users, make sure they have access to the view you've created. Gadget configuration panel will suggest to make this view public – click Let everyone use this view to make the view available to everyone.
- Click Save.
- The created view will have basic default columns (issue key and summary). Adjust the view by adding, removing or rearranging columns – see Customizing Columns for details.
- A message "View has been adjusted. Save | Revert" will appear in the gadget footer. Click Save.
If the user viewing the gadget does not have Use permission on the configured view, the gadget will show a default view with only Issue Key and Summary as columns.
When you see the "View has been adjusted. Save | Revert" message in the gadget footer, it means that you have changed the columns configuration for this gadget. These changes are local and are effective only in the same browser they were made in. Click Save to save and share the changes or Revert to go back to the configuration stored on the server. See Saving and Sharing Views for details.
Using the Gadget
The Structure gadget contains a stripped-down version of the standard Structure widget that you see on other pages. Because the screen space available to a gadget is usually limited, it lacks features like search and secondary panels. It also doesn't have a toolbar. However, most keyboard shortcuts are functional. If the gadget allows editing, you can rearrange issues with drag-and-drop; you can also move, create, edit, and delete issues using the keyboard.
Structure Dashboard Gadget is a bit limited when it comes to editing issue fields, due to some incompatibilities between field editors and gadget framework. Because of this, only a handful of fields can be edited from within Structure Gadget. See Editing from Gadget for more details.
If the gadget is displayed in its "home" Jira dashboard (not in Confluence or elsewhere), the last column lets you use the action drop-down for issues.
Open on Structure Board
Working from the Structure Board provides the most unrestricted Structure experience. To get to the Structure Board from a gadget, click the Open link.

The structure will open on Structure Board with the same filters and transformations that were applied in the original gadget. For examples, if the gadget only shows items from a specific project, sorted by Assignee, that's exactly what you'll see on the Structure Board. To review or remove these transformations, click the Transformations button ![]() in the panel toolbar.
in the panel toolbar.